Tag Archives: Sugar

So pale, extra pale 2 bottled

Monday was Australia Day and doubled as bottling day for the Extra Pale Ale #2. It was a very quick session and I knocked it over myself in a bit over half an hour.

Extra Pale Ale 2 bottled

Extra Pale Ale 2 freshly bottled and all cloudy

Skipped the bulk priming and put a tablespoon of white sugar to prime each bottle. Should have done it with the Extra Pale Ale #1 as it was much quicker than the bulk priming for small batches. Ended up with twelve bottles and a gravity sample as well.

Extra Pale Ale 2 FG

Extra Pale Ale 2 final gravity reading

Gravity came in at 1.025 which means the beer will sit at about 8.7% alcohol after bottle conditioning. Was a bit surprised the gravity wasn’t lower, much lower. I realised the Malto Dextrin had a bit of effect, plus it was probably a bit much to ask that kit yeast to chomp through so much sugar. That said, I was hoping to get down to the 1.009 calculated, or at least around 1.015. Not to be.

As usual I tasted the gravity sample. First up it was bad. Lots of apple sweet flavour and not nice yeast. After it sat for about 20 or so minutes the taste was a lot better. Still not great, but I could finish drinking the small sample. This one will take a while to condition properly probably a month or more.

Nothing brewing at the moment. Thinking of doing a couple really small batches. Maybe cider with the brewing caps. Maybe finally getting around to those ‘not beers’. Will keep you posted.

-Mikey

Tagged , , , , , , ,

New year brew, extra pale two

Hello and happy new year. Apologies for the break between posts, nearly four weeks! Back on board and, more importantly, back to brewing. Sunday the 11th was the first brew for the year and Chas came over to lend a hand. Always a fun day when Chas makes it.

Extra Pale Ale 1 bottled

Extra Pale Ale 1 all bottled and capped

There was some tasting of the Pale Trial Zwei beers and bottling of the Extra Pale Ale #1. Although only four litres, we still bulk primed. In hindsight that might have been a bit over the top for 10 bottles.

Gravity reading came in at 1.010 pretty much smack bang on what I was aiming for. Alcohol calculated at exactly 8% after bottle conditioning. Nice and strong.

The flavour was a bit of a mix. There was some some apple aroma and other fruit. Taste was much the same with a slight round, but clear, yeast flavour. Quite possible there’s some acetaldehyde and the yeast was stressed out by being forced to work so hard. Plus it was kit yeast, and that’s not usually good.

Extra Pale Ale 2 OG

Extra Pale Ale 2 original gravity reading

The brew for the day was straight forward. Almost identical to Extra Pale Ale #1. This time added more sugar and some malto dextrin. The sugar should push up the alcohol towards the 10% region, while the malto dextrin should help it hold together.

  • 4 litre boil
  • 300 grams Pilsen Light DME @ 40 mins
  • 200 grams Malto Dextrin @ 5 mins
  • 500 grams raw sugar @ 5 mins
  • 2 grams Warrior hops @ 30 mins
  • 3 grams Amarillo hops @ flame out
Extra Pale Ale 2 ready to go

Extra Pale Ale 2 in the fermenter in the pot and ready to go

Ice was dumped directly into the pot during the ice bath. That helped cool the brew and topped up for water lost in the boil. In the end it was a bit too much liquid and the fermentation vessel was fuller than I would have liked. And, yes, it did cause a blow out in the air lock.

The wort was dumped straight onto the yeast cake of the last brew. There should be plenty of yeast to eat through the large amounts of sugars there. Gave it a very good shake up, going to need all the oxygen it can get.

The gravity reading came in at 1.087 which is exactly what I calculated. Nice to finally hit a target OG for the first time ever, even if there was to much water.

It’s been nearly two weeks already. Bottling will be soon, maybe end of the long weekend. Should get some idea how it will taste. Hoping that the Malto Dextrin gives it some body to help balance out the large amount of sugar added.

For the next brew? Not sure yet, but likely this year will continue the experimentations and small batches. Temperatures are still pretty hot in Melbourne and it’s hard keeping fermentation vessels cool enough.

-Mikey

Tagged , , , , , , , ,

A little Christmas, extra pale ale

I couldn’t let December go by without doing a brew. So, decided to brew up a nice dry light body pale ale. Really simple and really easy. Knocked it over in about an hour.

Extra Pale Ale OG

Extra Pale Ale original gravity reading

After the Summer Ale turned out to be bigger than expected, I wanted to go basic. The best option was a simple malt base, simple hops and simple yeast. I deliberately aimed for something that would be dry and low in flavour. Welcome the Extra Pale Ale. In theory this will be the Summer beer that the Summer Ale wasn’t.

Recipe

  • 2.5 litre boil, topped up to 4 litres at end.
  • 300 grams of Pilsen Light dry malt extract @ 30 mins
  • 300 grams or raw sugar @ 10 mins
  • 2 grams Warrior hops @ 30 mins
  • 3 grams Amarillo hops @ flame out
  • Bit over a teaspoon of kit yeast
  • Teaspoon of yeast nutrient

The original gravity came in at 1.069 which is a fair bit higher than the 1.059 calculated. Most likely due to loss of water / not adding enough water at the end. That doesn’t worry me.

The colour turned out a lot closer to what I wanted than the Summer Ale did. Very light straw colour. Hope it thins out a bit more. Will be fine if there’s very little body in this.

Extra Pale Ale staying cool

Extra Pale Ale carboy in pot of water staying cool

The sample tasted pretty good. Yep, there was a lot of sugar in there but that doesn’t take anything away from the yummy Amarillo flavours. IBU should be around 16 which should help make this drinkable. I have seen a few of my beers turn out a lot bitter than planned. I’m hoping I’ve gone low enough on this one.

Big challenge now is keeping it cool. The carboy is sitting in water and the next couple days I can keep replacing ice packs in there. Fingers crossed. Will find out in the New Year.

-Mikey

Tagged , , , , , ,

Testing the tester, hydrometer check

Been a bit quite around here. Sorry about that. Chas is taking it easy on the brewing front and I was away interstate for a nine day holiday. Back now.

As I mentioned in the write up of the bottling day of the Summer Ale, I cracked another hydrometer. That’s three dead in two years. Lucky for me I have a spare, but it’s still a pain. My preference is to have one really good hydrometer that I can use, and keep.

Over the last few days I was thinking about this, and feeling sorry for myself. I was also concerned that all the gravity readings for the Summer Ale might be wrong. What could I do? Then I realised I could check it against the good hydrometer. Get a reading with the broken one, and check what it is with the working one. I still have an older one with with a missing tip (where glass broke off) and thought it would be good to see what its readings were.

So, using water and a whole lot of table sugar that’s exactly what I did. I filled up a tube, added some sugar, stirred and shook it up, then took a reading with all three hydrometers. Then added more sugar tested with all three again, and repeated.

Gravity readings as follows:

Testing equipment

Testing equipment with tubes and hydrometers

  1. Not Broken = 1.000
    Cracked = 0.997
    Missing Tip = n/a (not enough to float in)
  2. NB = 1.005
    Cr = 1.001
    MT = 1.008
  3. NB = 1.025
    Cr = 1.021
    MT = 1.029
  4. NB = 1.048
    Cr = 1.043
    MT = 1.052
  5. NB = 1.060
    Cr = 1.055
    MT = 1.064

Overall it looks like the cracked one is 0.003 to 0.005 below what it should be. The one missing its tip is 0.003 to 0.004 above what it should be. Both of those are pretty close. The variations in the difference could be put down to me not reading the gravity correctly and/or sugar still dissolving into water. In theory I could continue to use these broken hydrometers and adjust by +0.005 or -0.004 each reading. That’s not ideal, so I’ll still buy a new one.

What does this mean for the Summer Ale? Not much. As original and final gravity reading would have been out by (about) the same degree, it’s still 3.3% alcohol. And it will be time to try it very soon.

– Mikey

Tagged , , ,

Sneaky Milky Cider 1-3 – Review

After only a week in the bottles, on Saturday 18th it was time to open the Sneaky Milky Ciders. There were three versions and from the bottling I was pretty sure that number three would be a winner for the sweet tooth drinker. I wasn’t wrong. There wasn’t a huge amount of the cider brewed, but still plenty left over afterwards.

I’ve put all three cider tastings into one review. They deserve to be rated aginst each other. The idea was to make a sweet tasting and very easy to make cider. So, without any more delay lets get into it.


Sneaky Milky Cider 1-3

Sneaky Milky Cider 1 to 3 for review

Sneaky Milky Cider #1

Has a clear ‘Granny Smith’ apple aroma. It’s apple-y but also slightly sour.

Light fruit and sweetness in the start and some sour comes in. Quite refreshing at first.

Fills out with slightly more creaminess. Then moving to be more apple flavour before settling back into a Granny Smith apple flavour of slight sourness. Finishes with a dry and hint of tart taste.

Overall I’d classify this one as a dry cider.


Sneaky Milky Cider #2

Has more of a nondescript apple aroma. It’s slightly sweet  but nothing much either way.

First very light flavours. Hints of apple and sweet. Then the apple sweetness picks up. It becomes a bit like a fake sweet apple flavour you find in lollies. Verging on sickly sweet and still not quite tasting like real apple.

There is some slight filling out of the cider. But not much, leaving an empty feeling to it. Ends sweet, but also very dry. My mouth is confused. The front says sweet and the back of my mouth is desperate for water.

Along the way there is plenty of sweetness. Once that’s gone there isn’t much too this. This makes you want to drink some more, just to have something. But that’s where the real problem lies. At 7.2% this is going to mess you up, quickly.


Sneaky Milky Cider #3

A much sweeter aroma than the other two.

Starts as a soft light sweet apple taste. Then a full apple flavour builds. More sweetness and the apple flavour stays with you right to the end. Feels like there’s some good body to this.

Really enjoyable, at least compared to the other two. Plenty of flavour and easy to drink the whole way though. Overall I’d classify this as a sweet cider. Sweet tasting and sweet brewing.


 Verdict

The winner is clearly number three. Is it the yeast flavours? Or is it that the yeast didn’t eat through all the sugars? Does it matter? Not really. But I think it’s more to do with the former, rather than the latter. Will more be made? Absolutely. Next time I’ll take the lactose up a level and see what happens.


-Mikey

Tagged , , , , ,

Apples and milk, in bottles

It’s not really milk that went into the apple cider. I simply like the idea that lactose sugar is milk sugar, and therefore milk. The important thing is that the Sneaky Milky Cider has been bottled. Plus the samples tasted pretty good.

Sneaky Milky Cider 1 FG

Sneaky Milky Cider 1 the Final Gravity reading

On Saturday evening I got busy and bottling. There are three batches across three carboys. Each had a splash over two litres in them. These were some very small batches, the smallest I’ve ever done. Used the auto syphon again which works pretty well. Manually priming each bottle wasn’t a huge pain as the batch sizes were small, plus I used a few 500 ml bottles which sped things up.

Sneaky Milky Cider 2 FG

Sneaky Milky Cider 2 the Final Gravity reading

Gravity readings were a bit all over the place. I’m not surprised given the range of ingredients across the batches. The first one dropped from 1.060 to 1.012 which means after bottling will be 6.8% alcohol. The second one was more pronounced falling from 1.055 to 1.004 turning it into 7.2%. Then the third was more reasonable going from 1.055 to 1.011 and hitting 6.3%.

After gravity readings were done it was tasting time. The first batch had a nice sweet and apple flavour. There was also a hint of sour to this, but wasn’t overpowering or distracting. The second batch had similar characteristics but cleaner. That said, the sourness was more pronounced and it wasn’t as sweet as batch one. The last batch was noticeably different. It had a bigger mouth feel and overall rounder flavour. As a result this batch didn’t have the same noticeably sweetness or apple flavour.

Sneaky Milky Cider 1-3

Sneaky Milky Cider 1 to 3 for tasting

These ciders are only going to be bottle conditioned for a week before most of them are consumed. They will be the sweet cider option for those not drinking beer at a party this Saturday. The beer on offer will be the Pale Trial beers, 1 to 5 of both Eine and Zwie. I’m looking forward to hearing feedback on all of them. And I how that there’s enough to go around.

-Mikey

Tagged , , , , , , ,

Sweet like apple, sweet like milk

Sneaky Milky Cider 3

Sneaky Milky Cider 3 Original Gravity reading

A few months back in February I made the Sneaky Cider. Once I tasted it I knew this was something to revisit. It was easy, quick and nice enough. Nothing amazing but great vale on effort put in.

The biggest issue with the cider was the dryness. All the sugar in the apple juice was used up by the yeast, all converted to alcohol. That’s good if you want a strong cider, and you don’t want sweetness. Problem is, most people want cider to be sweet. Hence this being an issue.

I have been thinking how to overcome this issue for a while. The big companies, and even smaller commercial brewers, trend to put sugar or fresh apple juice back in. That’s fine if you can (1) remove all the yeast and (2) keep the carbonation or force carbonate. On a small home brew scale that’s not so easy.

Looking for alternative options to sweeten the cider, there are a few. Some range from easy to complex with quite a number tried and failed. But before looking up all these options I had thought of using what I use for beer. Lactose sugar. Yep, milk sugar.

Lactose is used in stouts as it gives both sweetness and helps with the creaminess. The creamy flavour mouth feel is not something you really associate with cider. But I’m hoping it’s either subtle or non offensive. Preferably both.

So, on Monday night I made Sneaky Milky Cider 1, 2 and 3. All use the basic 2 litres of apple juice and have sugar added to them. Details below.

Sneaky Milky Cider 1-3

Sneaky Milky Cider 1 to 3 in the carboys

Sneaky Milky Cider 1

  • 2 litres of apple juice
  • Around 80 grams white sugar (measuring was off)
  • 80 grams of lactose
  • OG = 1.060
  • Half a teaspoon of Champaign yeast
  • Half a teaspoon of yeast nutrient

Sneaky Milky Cider 2

  • 2 litres of apple juice
  • 80 grams white sugar
  • 40 grams of lactose
  • OG = 1.055
  • Half a teaspoon of Champaign yeast
  • Half a teaspoon of yeast nutrient

Sneaky Milky Cider 3

  • 2 litres of apple juice
  • 80 grams white sugar
  • 40 grams of lactose
  • OG = 1.055
  • Half a teaspoon of US-04 yeast
  • Half a teaspoon of yeast nutrient

Amounts of sugar are based on what the original Sneaky Cider was. I’m not sure if there’s too much, or not enough lactose. Also, there was a bit more than two litres of juice in each bottle. About 200ml more. That shouldn’t make any difference to the final product.

You’ll see that I’ve used US-04 yeast in one. This is an ale yeast, but it should ferment clean enough. The reason for using this is to see if it won’t convert all the apple sugars. As the alcohol gets higher the yeast should slow down or even die. This would then leave some unfermented sugar, and the cider would be sweeter. We’ll wait and see.

-Mikey

Tagged , , , , , , ,

Long time coming, long time to wait

Since very early on home brewing I’ve wanted to make a good lager. After a bit of looking about, reading up on it and asking a few other brewers I decided to dive in.

The first attempt was as part of basic home brew kit. It was more of a very pale ale rather than a lager. The yeast was from a kit can and then it was fermented with out any temperature control. It turned out a bit rough and didn’t get much better with age.

Since that brew I wasn’t  in a rush to do another lager. Reading up on the process others use, strict temperature control and long term storage, really tuned me off. Then a fellow home brewer, Carnie Brewing, posted on his blog about his attempt and quick turn around. That got me interested again.

Pseudo Lager boil

Pseudo Lager boiling away on the stove

Yeast was the main sticking point. I didn’t want to do a big batch in case I stuffed it. So, I decided to do a trial run with US-05 at a low temperature. Due to using ale yeast, instead of lager yeast, I’ve decided to call this Pseudo Lager. If it turns out well I’ll look at doing a bigger batch with proper lager yeast.

  • Amber Dry Malt – 600 grams (60 mins)
  • Light Dry Malt – 300 grams (10 mins)
  • White Sugar – 1.1 kilograms (10 mins)
  • Victoria’s Secret hops – 5 grams (60 mins)
  • Crystal hops – 10 grams (flame out)
  • US-05 yeast – about 3-4 grams

This was a pretty basic brew. For a quite some time I played around with the idea of splitting out the hop additions into three, but stuck with two as I wanted to highlight the Crystal hops at the end. The 5 litre boil was for 60 minutes so was able to get enough bitterness (IBUs) from the little Victoria Secret hops at the start. All the amber malt went in at the start. The malt selection was based on what was in the house. Originally I thought there was more light malt, but that wasn’t to be. Light malt was added at the end with the sugar, which was there to keep the finish dry and alcohol up.

Pseudo Lager fermenter

Pseudo Lager done and in the fermenter

Before the boil started I re-hydrated the yeast. I added in a little bit of light malt to try and get some yeast starter going. As this was only for about one and a half hours I’m not expecting much.

Cooling went very well. The process I’ve got to dump a lot of ice directly into the wort seams to work well. Got a bit excited and poured the whole wort in without sieving out the hops. Whoops. Then I realised as I was filling up the fermenter that I forgot the Crystal hops! Uh Oh! So, I just dumped the hops into the fermenter and continued filling it up to 16 litres. I suppose it will be something like flame out/dry hopping. Hopefully.

The gravity reading came in at 1.049 which is exactly what the recipe said it would be. Due to all the sugar in there it should ferment out to finish with a gravity of 1.005. That would be about 6% alcohol after bottling. That’s exciting for a lager.

I deliberately left this in the shed with no heating. The temperature out there drops down a fair bit. Down to maybe 10 degrees Celsius, or less, overnight. Then during the day up to a maximum of 18 degrees Celsius. I’ve left this on purpose to help keep the yeast working at a larger-like temperatures. Not sure if this will do anything other than drag out the fermentation.

After two days the beer is bubbling away. It’s very slowly doing that, but it is happening.

-Mikey

Tagged , , , , , , , , ,

Mikey’s Cider – review

So, Mikey was trying some new fancy screw on plastic bottle caps for making cider.  He made two lots of cider with different OSGs and we were excited to see what happened.

Well, the caps worked great.  There’s a little valve in them so the fermentation happens in an old plastic bottle; let that sit for a couple weeks and the cider is done!  Unfortunately I don’t think it was allowed to ferment for long enough…

The first bottle had an OSG of 1.089, which is pretty high!  I believe the final gravity was around 1.035 (I didn’t write it down, oops!), which is still much too high, and the sweetness was still there in a big way.

Mikey CiderUnfortunately the sweetness really took over and didn’t allow anything else through.  I was able to find a little apple tang at the back, but it was difficult.  The sweetness kept building up over a few sips and was quickly becoming difficult to drink.  It was tasting pretty close to straight cordial.

The second bottle, which had more sugar and an OSG of 1.111 was even worse!  There was no apple flavour to be found in it, just sugar.

We’re going to try and let it ferment a week or two longer and see if things can be recovered.  Mikey seems pretty confident but I’m a bit skeptical.  Let’s see if he can prove me wrong!

-Chas

Tagged , , , , ,

Cap off, Cup day crazyness

Tuesday was Melbourne Cup day. The race that stops a nation. Well, nearly. I forgot to turn on the TV and only got to see the winning jockey and trainer being interviewed. Whoops.

But that’s not what Tuesday was about. Tuesday was a very special day. I went a little crazy and made some cider.

Yep, the guy who normally doesn’t drink the stuff has made some. It came around due to a couple points. First, summer is coming up and need some more ‘lighter’ drinks. Second, with summer comes festivals and outdoor events. They don’t normally like you bringing in glass bottles which means using plastic bottles.

I’ll be getting around to brewing some pale ales. And I’ll get around to trying plastic bottles for beer, actually it will be this weekend. This cider crazyness is all about me experimenting. I didn’t even have Chas helping out!

Those who know us or have been reading our posts for a while will know that we’re fans of Craig Tube. For those who don’t know him, he’s a Canadian home brewer who has been posting videos up on home brewing for years. There’s a lot if great instructional videos on kit and extract brewing. If you’re starting off go check out the Easy Home Brewing – Beer series.

Anyway, Craig did a mini review of some Pat Mack’s Home Brewing Caps. They allow you to ferment in a bottle! It looked really easy, like a lot more than what you do for a kit. So, I ordered some online and waited a few weeks for them to make their way from London to Melbourne.

The caps come with “Champaign” yeast, which is high alcohol producing yeast. The pack also comes with a couple recipes and a whole lot more online.

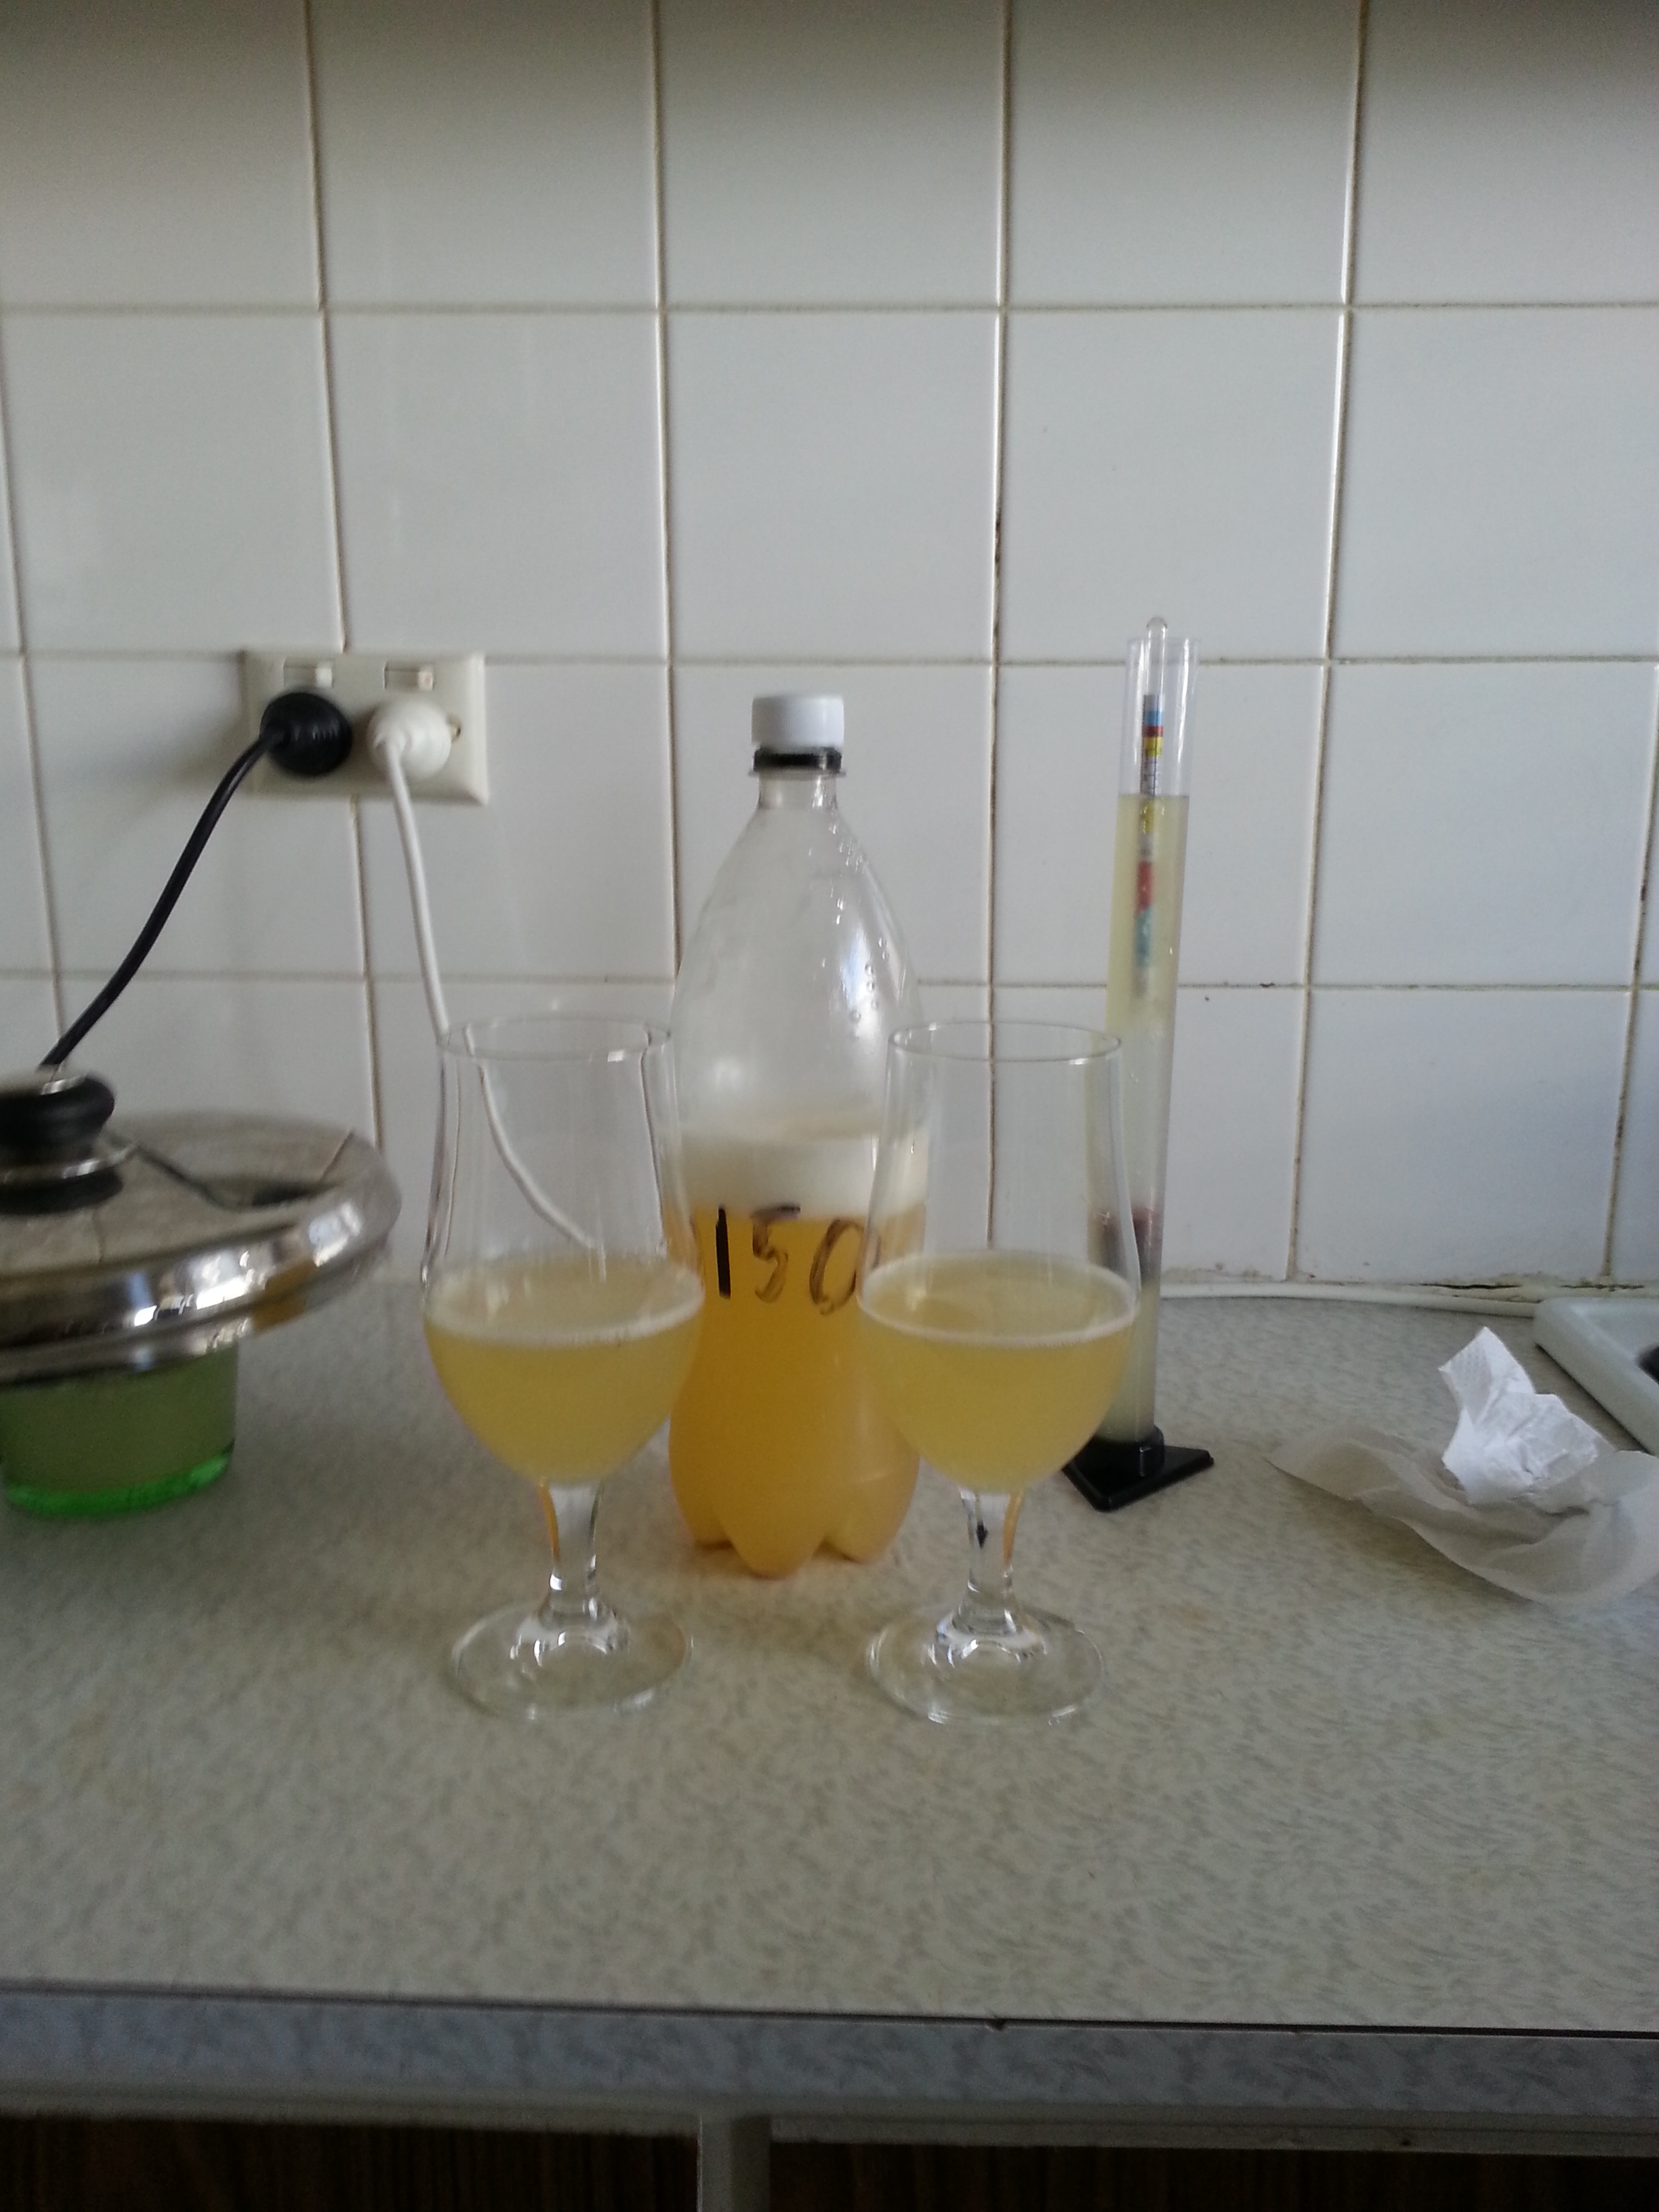
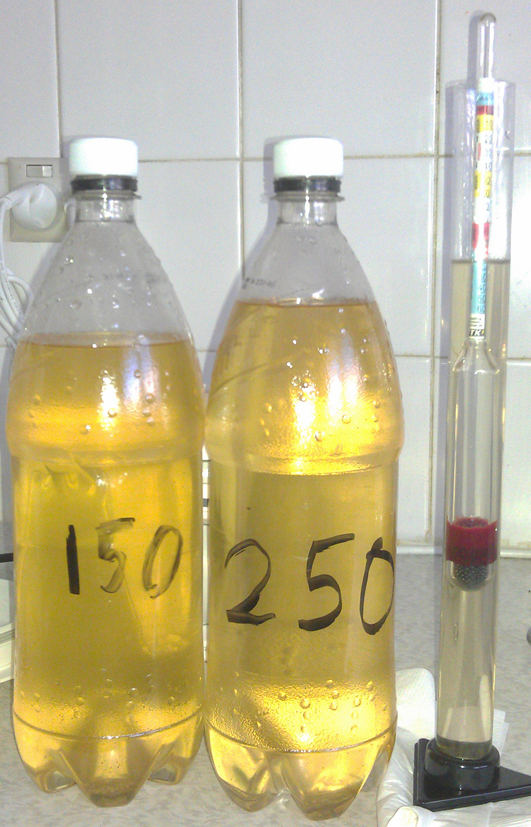
The promotion of these caps has been about producing cider. So, I thought that would be appropriate to try that. The recipe only needs apple juice and sugar, easy! There were two caps in the kit I bought and wanted to try two variations with different amounts of sugar.

Apple Cider 1+2

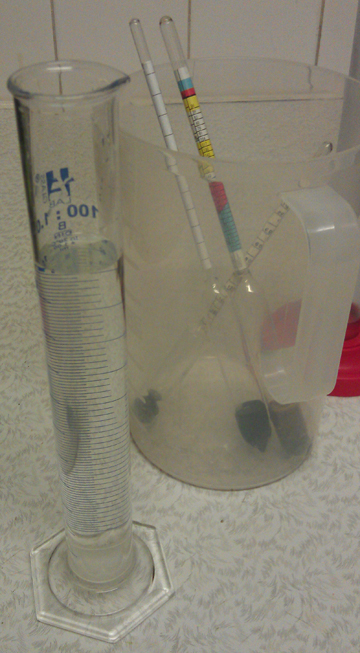
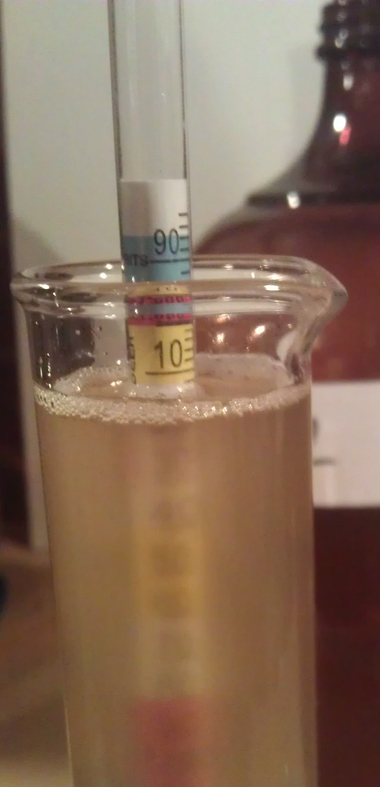
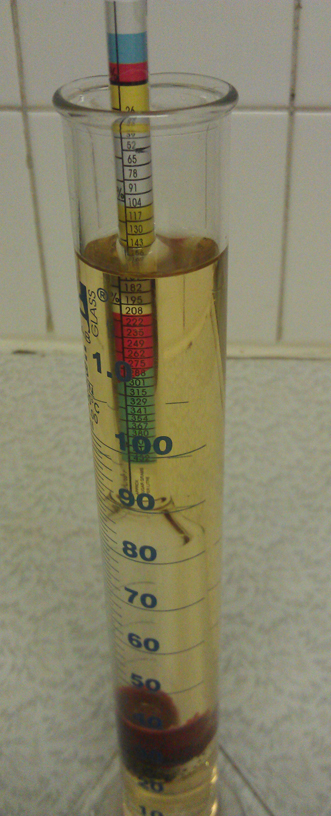
Apple Cider #1 and #2 in bottles with gravity reading

Bottle 1.
1.2 liters of apple juice
150 grams of sugar.
1/8 th (ish) teaspoon of yeast.
1/4 th (ish) teaspoon of yeast nutrient.

Bottle 2.
1.2 liters of apple juice
250 grams of (caster) sugar.
1/8 th (ish) teaspoon of yeast.
1/4 th (ish) teaspoon of yeast nutrient.

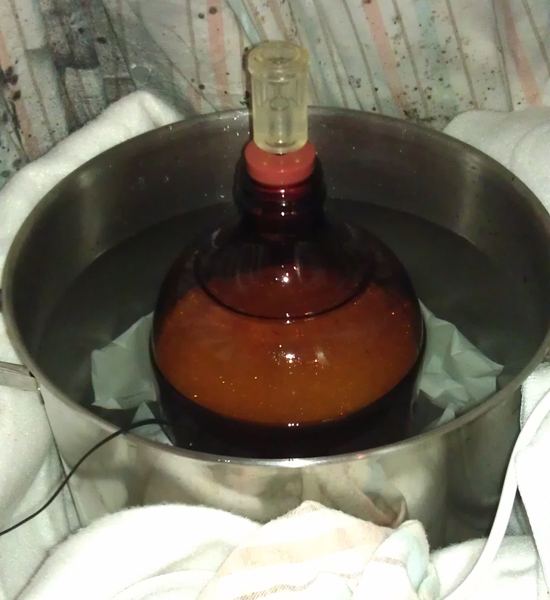
Process is exceptionally easy. Put juice in blender. Add sugar. Blend. Pour into bottle. Add yeast (and nutrient). Put lid on. Shake. Done.

The yeast nutrient was probably not required. But after the low fermentation I’d a few beers at my place I didn’t want to take any risks.

A you can see the only difference is the amount of sugar. I deliberately wanted to see how the difference in sugar levels would work. Of course the gravity readings were going to be high. I sort of expected something like the 1.089 original gravity for bottle 1. But was still a little shocked when it came in as 1.111 for bottle 2.

The idea is to only let it ferment for a week. Then they will go in the fridge for a week to settle out. In theory this should prevent full fermentation. That means it should still be sweet and should not be too high in alcohol. Will wait and see.

-Mikey

Tagged , , , , ,