Category Archives: General tips

Testing the tester, hydrometer check

Been a bit quite around here. Sorry about that. Chas is taking it easy on the brewing front and I was away interstate for a nine day holiday. Back now.

As I mentioned in the write up of the bottling day of the Summer Ale, I cracked another hydrometer. That’s three dead in two years. Lucky for me I have a spare, but it’s still a pain. My preference is to have one really good hydrometer that I can use, and keep.

Over the last few days I was thinking about this, and feeling sorry for myself. I was also concerned that all the gravity readings for the Summer Ale might be wrong. What could I do? Then I realised I could check it against the good hydrometer. Get a reading with the broken one, and check what it is with the working one. I still have an older one with with a missing tip (where glass broke off) and thought it would be good to see what its readings were.

So, using water and a whole lot of table sugar that’s exactly what I did. I filled up a tube, added some sugar, stirred and shook it up, then took a reading with all three hydrometers. Then added more sugar tested with all three again, and repeated.

Gravity readings as follows:

Testing equipment

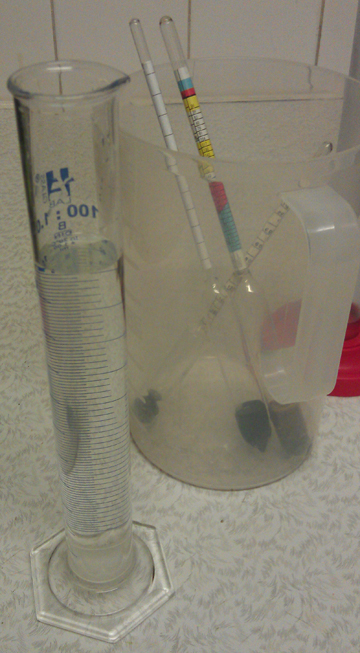
Testing equipment with tubes and hydrometers

  1. Not Broken = 1.000
    Cracked = 0.997
    Missing Tip = n/a (not enough to float in)
  2. NB = 1.005
    Cr = 1.001
    MT = 1.008
  3. NB = 1.025
    Cr = 1.021
    MT = 1.029
  4. NB = 1.048
    Cr = 1.043
    MT = 1.052
  5. NB = 1.060
    Cr = 1.055
    MT = 1.064

Overall it looks like the cracked one is 0.003 to 0.005 below what it should be. The one missing its tip is 0.003 to 0.004 above what it should be. Both of those are pretty close. The variations in the difference could be put down to me not reading the gravity correctly and/or sugar still dissolving into water. In theory I could continue to use these broken hydrometers and adjust by +0.005 or -0.004 each reading. That’s not ideal, so I’ll still buy a new one.

What does this mean for the Summer Ale? Not much. As original and final gravity reading would have been out by (about) the same degree, it’s still 3.3% alcohol. And it will be time to try it very soon.

– Mikey

Tagged , , ,

New 101 – brew types

Another Thursday and another 101. This week I’ve put up some information on the four brew types; Kit & Kilo, Extract, Partial Mash, and Full Grain.

A quick note. Some people think that Kit & Kilo (K&K) brews are just Extract brews. I’ve provided a bit of background as why we’ve kept them as different types of brew.

The 101 on equipment has been pushed back a week for this one to go up. I felt it was important to cover off the brew methods first as this impacts the processes, what ingredients are needed and what equipment you use.

This weekend there’s no home brewing as Chas is glob trotting. I’ll get one or two home brew reviews up over the next few days.

-Mikey

Tagged , , , , ,

New 101 – Cider

Like some ghost from beyond the grave, Chas has put up the new 101 from the other side of the globe while asleep. No, it’s not some crazy magic. Okay, maybe it is.

This week’s 101 is on Cider. Chas wrote this up before he ran overseas. By all accounts the beers in Scotland are great, as you would expect from the UK.

Like all our 101’s let us know if you think anything should be changed. We’re not perfect and always learning more.

-Mikey

Tagged , ,

New 101 – beer ingredients

So, far so good. First 101 went up last week and a week later second one is going up.

This week we’re looking at the basics of beer ingredients. There’s a lot of detail behind it all, but really there’s four main ingredients  MaltHopsWater and Yeast.

Page is under the 101 section. Hope you like it. Let us know if you think something else should be added, removed or fixed.

-Mikey

Tagged , , , , ,

Brew 101, it’s what you want

For the past couple months we’ve been letting you all know what we’ve been up to. What we brew. What goes in. What it ends up like. And that’s been great. We have even touched on what’s involved in the brew process.

The feedback has been that people want more. Friends, family, work colleges, barristers that we visit regularly, and random strangers out and about. Its something I was planning on doing after the Journey To Home Brew series. Its something Chas wants to do. And the time is now right.

So with that in mind we are proud to present… (drum roll) Brew 101!

We’ll aim to get a new one up every week (or so) over the next few months. The start will be on the very basics and we’ll work our ways across different brewing methods, styles, ingredients, equipment, bottling, cleaning, and everything else brew related. We won’t get it right first time for everything. We’re learning a lot of this stuff too. So, we’ll fix and add things over time.

First cab off the rank is 101 Brewing concepts.

-Mikey

Tagged , , , , ,

Search engine terms #1

Howdy!

I’m really into data and numbers, so I spend a good amount of time checking out the stats for We Make Home Brew.  One thing I’ve found interesting is the search engine terms; what people are searching for when they stumble upon this blog.

This has inspired me to do two things.  Firstly, there is a handy new section above that provides links to the occasional general tip article that we do.  Secondly, I thought I’d share some of the search terms and expand where possible.  Hopefully whoever originally found this blog through a search engine is still reading and now has their question answered!  Feel free to comment with questions and I can go into things further.

Adding to this, we’re currently in the process of writing some other general informational posts that we’ll throw into the new section.  A lot of this is to provide some information, a lot of this is because we’re taking a brief break from brewing because I’ll be going on holidays for about a month!

How do I make cider?  Also various cider related searches.

One of the reasons for the new tips and tricks section.  I’ve done a general run down on cider making here.

Buy super yeast for wine

All yeast is pretty super.  This is a bit of a strange search to do.  I have done a post on yeast, but there is so much to consider, it’s probably best to consult your local home brew store: they should be able to advise you on the best yeast to use for your brew.  All yeasts are different and it’s best to make sure you’re using the most appropriate yeast.

In relation to wine yeast, I’ve only used the SN9 wine yeast for my ciders.  This is advertised as generally good for whites and sparkling wine.  I’ve found it’s a pretty clean yeast that doesn’t leave any yeasty tastes.  What I’ve also found is that it’s a fairly slow fermenting yeast when compared to ale yeasts I’ve used.

Fermentation blanket

I’m not sure where this pointed the searcher, but I think we’ve made references to such things… I keep my fermenter in the kitchen, so I generally just throw a towel or an old blanket over it to keep things warm.  I’ve found that the fermentation process creates a little bit of heat, so in a modern house, a decent blanket can work wonders.  My kitchen also gets a fair amount of morning sun, and it’s best to keep UV off of your brew, so the blanket also helps to block the sun

Mikey, on the other hand, keeps his fermenter in the garage (AKA the Brew Dungeon).  Mikey has insulated a cupboard with old sheets which does a pretty good job.  To compliment this, Mikey also has a heat pad to use in case of emergencies.  Heat pads can be purchased at most home brew supply stores; I’ve even seen heat belts for sale as well.  For general heating, Mikey has thrown some Christmas tree lights into the cupboard.  Keeping these on for a few hours a day does wonders.

I’ve seen and read about various other home made temperature regulation systems.  A popular thing to do is to use an old bar-fridge (not plugged in).  Refrigerators are designed to be very well insulated, so the temperature should stay fairly constant.  Heating/cooling sources can be added to the fridge if the temperature is wrong.

Will yeast die if it gets too hot?

it depends on what is meant by “too hot”.  But yes, yeast is a living thing and will die if things get too hot, it’s always best to keep things in recommended temperature ranges (the yeast packet should tell you).  Even if the yeast doesn’t die, you can create fusel alcohol by mistake.  Fusel alcohol may form at temperatures above about 27 degrees C.  Unfortunately, if the temperature is too low for your yeast, the fermentation process may be too slow (same if you under-pitch your yeast), once again causing the yeast to sit in your fermenter for too long, causing other off tastes or also fusel alcohol formation.

Similar problems can happen if the wort isn’t aerated enough prior to pitching.  This can cause a build up of nitrogen in the fermenting wort, and once again, causing impurities or the wrong types of alcohol to form.

That’s it for now.  Maybe I’ll really nerd out and make some graphs in the future, we’ll see!

-Chas

Tagged , , , , , ,

Yeast!

Howdy!

I thought it would be good to talk about yeast: the magic little organism that turns sugars into alcohol through the process of fermentation.

I won’t go into the fermentation process, but if you’re curious, the Wikipedia articles are quite easy to follow.  Fermentation in general can be found here – this article is not specifically about alcohol fermentation, but explains the process in general.  Alcoholic fermentation information can be found here for further reading.

Yeast in general:

Really, you can use any kind of yeast for fermentation, even regular baker’s yeast bought at the super market, but the various brewing yeasts are specifically designed for taste and alcohol tolerance.

On that note, it is possible to kill your yeast if the alcohol content of your brew gets to high.  At this point, you can’t really get anymore fermentation going because even if you add more yeast, that will probably die too!  Then you’re left with a half fermented beer that still has lots of sugars in it, which would probably taste quite interesting, but not in a good way.  Don’t worry too much though, it’s easy to track down yeasts that will be good well into the high teens/twenties on alcohol percentages; these are generally wine making yeasts.

If you’re making a cider or anything with fruit, it’s also possible to use the wild yeast that naturally grows on fruit peels.  In fact, my mother uses this to make home made vinegar: her most interesting concoction was a banana vinegar!  The problem with using wild yeast is ensuring that it’s only the wild yeast that goes into your wort (or juice if doing cider) and not other bugs that will mess up your brew.  I have yet to attempt this, but it may be fun!

Yeast and temperature:

Yeast is pretty resilient, so if it gets too cold, you won’t kill it.  It just gets a bit sleepy and slows down a bit.  You can even freeze yeast if you want to preserve it.  This means that even if your wort gets a bit cold, things will keep working, just more slowly.  Although this isn’t too bad, be aware that if your wort is in the fermenting tub for too long, sediments may begin to taint the taste of your beer.

On the other side though, if your yeast gets too hot, it will probably die, just like anything else.  So although heat will help speed up the fermentation process, there is a point where you won’t get anymore benefit and the heat will actually be detrimental.  Make sure your wort is at specified temperatures before pitching your yeast.

Experimenting with yeast:

Of course it’s easiest to simply buy yeast from your local home brew supply store, but experimenting with different kinds of yeast can be a bit of fun.  The different strains that you can buy at a good home brew supply store have different characteristics for taste, optimal temperature, and alcohol tolerance.  This means that you’ll use a different yeast for different kinds of beers.

For example, there are specific kinds of yeast for ales, lagers, and wines.  With the few cider experiments I’ve done, I’ve always used an SN9 wine yeast and been happy with the results.  As it’s not desirable in a cider/wine, this type of yeast doesn’t leave any taste behind.  Sometimes you want some of that taste in your brew, and you can generally find a yeast that will do that for you.

That’s it on yeast for now!


-Chas

Tagged , , , ,

Buying in bulk

If you’ve taken a look at the Rules Of Home Brew you’ll have seen my advice about always having plenty of consumables such as bottle caps on hand.

Well, I took my own advice and bought this!

Yep, that's 1000 caps

Yep, that’s 1000 caps

I needed more bottle caps because Mikey and I will be bottling the the dark ale this weekend, and it just made financial sense.

Basically, as with anything, the more you buy, the cheaper it is, so buying 1000 caps is quite affordable. I would have got more sanitiser and sugar, but I’ve got plenty of that.

Adding to that, I was already shopping on line for some home brew supplies. Mikey and I have had some good luck with the BrewSmith kits, so we’ve decided to try and replicate one using our own recipe. We’ll be brewing that this weekend, and I’ll post the recipe then.

Unfortunately in my big online order, I forgot to include yeast! I have some spare yeast floating around, but it’s not the right kind, so I’ll have to pop down to my local home brew store before brew day. I’m not going to do a whole mail order just for a little bit of yeast…

Funny though, I was speaking to a friend about my horror at forgetting the yeast, and, since my friend isn’t a nerd, he didn’t know about all the different types of yeast and the importance of using the correct one.  Needless today, he now knows plenty!

Anyway, I’m pretty excited about my caps! I’m going to split them with Mikey so that we both get cappy goodness.

-Chas

Tagged , , , , , ,

So I bought a juicer…

So I bought a juicer by mistake.

As you may be aware, juicers make juice.  If one pours this juice into a container, pitches some yeast, and then seals it with an airlock, one has a lovely cider.  This is why I bought a juicer. According to the instructions, I also have the option of drinking the juice before I ferment it, but I don’t see a reason why I would do such a thing…

My new juicer!

My new juicer!

So this thing is hardly top of the line, but it will get the job done.  I’ve opted for the model that can fit a whole apple down the chute, just in case I want to do that.  I’ve done some research on juicing – maybe if I really get into this whole cider thing I’ll discuss juicing methods at length.

I’ve looked into cider making and the process is pretty simple:

  1. Get/make juice.  If you’re using store-bought juice, be sure there are no preservatives. Preservatives will mess with the final taste and may kill your yeast.
  2. Set juice on a low boil for about 15 minutes.
  3. Cover pot and cool the juice as quickly as possible.  This can be done by placing the pot in a sink full of cold water/ice.  Change the water out after 10 minutes.  Ultimately you want the temperature to be below 30 degrees C (slightly warmish).
  4. Put juice in carboy or fermenter.
  5. Pitch yeast.
  6. Place lid and airlock.
  7. Magical process!
  8. Bottle as per beer.
  9. Magical process!
  10. Cider!

The whole purpose of this cider endeavor is to just play around with different fruits and see what happens, so I’ll keep you updated.  I’ve already got a small batch of apple and rhubarb going in my new 5 litre carboy.  I’m not going to do a full report on this one though as it was all really haphazard. If it turns out remotely OK, I’ll do a proper batch of it and give the full recipe.

I have already learned a few things:

  • Apple or pear is probably your best base.  Start with this for the bulk of your cider and add other things to taste.  Just be careful of too much citrus, the acid may kill your yeast.
  • Your local brew shop will have good quality apple or pear juice in concentrate if you want it.
  • Similar to glucose, fructose, which is the main sugar in fruits, will ferment completely. If a sugar ferments completely, it won’t leave any sweetness or taste – it will all turn to alcohol.
  • Fructose will break down into other non fermentable sugars if you cut the apples up and leave them to sit for about 24 hours.  So if you want a dry cider, juice the apples immediately, if you want a sweet cider, cut them and let them sit.
  • Just the pure juice gives a pretty good OSG (I got about 1.045).  Feel free to add some glucose if you need some extra kick though, it shouldn’t alter the taste since it will ferment completely.
  • Use a good wine yeast.  Your brew store should be able to recommend something.  Just remember, don’t use a beer yeast.

I want to do some brewing this weekend.  If Mikey is available, we may do a lager similar to the big batch we did a few weeks ago, but tweaking the recipe slightly.  Alternatively, if I’m able to get enough apples, I might have a play.

Then again, I haven’t discussed the prospect of Random Cider with Mikey – he may love or hate this idea, but if he loves it, we may end up making cider together.

Regardless, I’m going to start experimenting with Random Cider as time goes by.

-Chas

Tagged , , , , ,

First adventures – keeping things warm

Howdy!

So it’s been about five days since we did the brew I talked about in my last post, and I’ve been relatively happy with the progress.

As I mentioned in my previous post, there was some concern about keeping everything warm enough during the fermentation process.  We were also worried about the morning sun hitting the fermenting tub: the UV can harm your yeast and make generally bad flavours.  To solve these two problems, the brew spent the week wrapped in a blanket:

Beer needs to me tucked in nice and tight when it gets sleepy.

Beer needs to be tucked in nice and tight when it gets sleepy.

This worked surprisingly well.  The yeast manages to produce some of its own heat during the fermentation process, so this blanket kept everything in.  Although my house got as low as about 13 degrees C over night, the wort consistently sat at about 22 degrees C when I checked it in the morning.  It could be a little warmer, but this is still a great temperature. And it was relatively constant, so that’s great.

Another alternative I’ve heard being used is to place your fermenter in an old bar fridge (not on). Refrigerators are extremely well insulated, so this method will keep everything warm (or cool), and more importantly constant.

In warmer months, this method can also be used to keep things cool, just don’t leave the refrigerator on constantly, otherwise things will be too cool.  If you get a fancy enough fridge (or a wine fridge), you may even be able to set it to work at a higher temperature.

Generally, the higher the temperature, the faster the fermentation process is – to a point obviously; if things get too hot, you’ll kill your yeast.  According to the packet, the yeast we used has an optimal temperature range of 21-28 degrees C.  So since the we’re running on the lower end of that scale, the fermentation process will probably take about eight or nine days.

So next step: bottling!  But that’s still a few days away…

-Chas

Tagged , , , , , , ,