Tag Archives: lager

Bottling day, plus surprise bottling

Saturday was a bottling day at my place. No brewing, just bottling. Was meant to be a quick one so we could get onto other things for the day.

Home Brewers R+D Vic Secret bottled

Home Brewers R+D Victoria Secret bottled and ready for conditioning

Chas came over and, unlike the last few days at my place, there wasn’t anything major getting in the way of starting. So we quickly got stuck into bottling the 13 odd litres of the Home Brewers R&D Vic Secret. Sannitising bottles is pretty easy with the tub and bottling tree. Went  with a mix of a few bigger 500 ml bottles and a fair few 330 ml bottles.

Bulk primed the beer was a simple affair. Did it in the big stock pot just like the Super Stout. But unlike the Super Stout we didn’t pour the thing into something else to bottle. We simply siphoned the beer into bottles. Done.

Pseudo Lager 1 bottled

Pseudo Lager 1 bottled and ready for conditioning

Before priming and bottling we did a gravity sample. Final gravity came in at 1.010 which means after conditioning it will be 3.4% alcohol. Not surprised as there was such a low original gravity. From tasting the gravity sample it was very hoppy and very bitter. Not sure how it will finish. I’m hoping this becomes a session beer and, if I can keep myself from drinking it all, something for the warmer months later in the year.

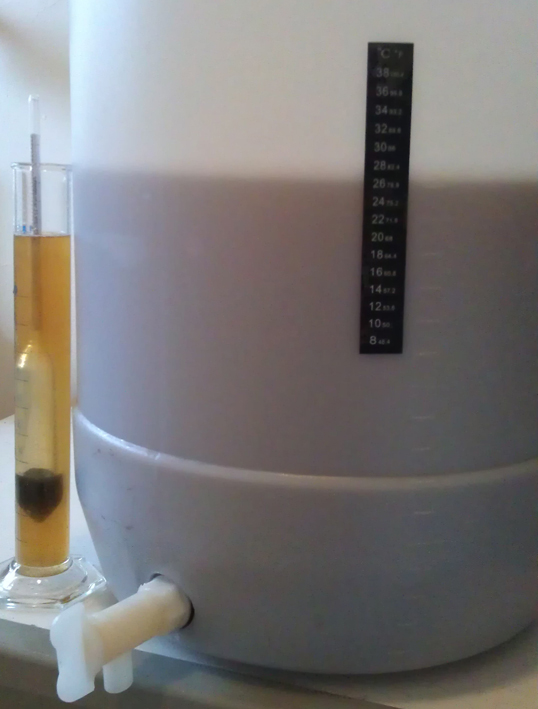
Before calling it a day I decided to take a gravity sample of the Pseudo Lager. Was very surprised to see it down to 1.006! I’ve been hoping it would get down to 1.005 but expected it to finish around 1.020-1.010. That’s a good result and means the beer will be 6.0% after bottling. It tasted pretty alright as well, quite dry and not a lot of hops. Should be good once it is carbonated.

Home Brewers R+D Vic Secret and Pseudo Lager 1

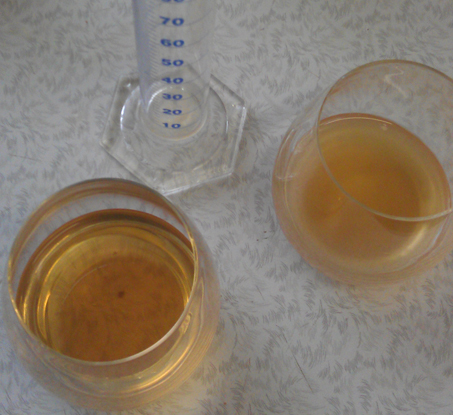
Home Brewers R+D Vic Secret and Pseudo Lager 1 samples ready for tasting

Chas wasn’t that excited about bottling another 16 litres of beer. But after a bit of negotiation, and a break for a bit, we got into it. Rather than bulk prime into the pot, we used the recently emptied fermentation vessel with the tap and a brew wand. Saved a lot of time and finished quickly.

A day of bottling. Normally nothing special, but a pleasant surprise with the Pseudo Lager. Looking forward to tasting and letting you know how it all worked out.

-Mikey

Tagged , , , , ,

Long time coming, long time to wait

Since very early on home brewing I’ve wanted to make a good lager. After a bit of looking about, reading up on it and asking a few other brewers I decided to dive in.

The first attempt was as part of basic home brew kit. It was more of a very pale ale rather than a lager. The yeast was from a kit can and then it was fermented with out any temperature control. It turned out a bit rough and didn’t get much better with age.

Since that brew I wasn’t  in a rush to do another lager. Reading up on the process others use, strict temperature control and long term storage, really tuned me off. Then a fellow home brewer, Carnie Brewing, posted on his blog about his attempt and quick turn around. That got me interested again.

Pseudo Lager boil

Pseudo Lager boiling away on the stove

Yeast was the main sticking point. I didn’t want to do a big batch in case I stuffed it. So, I decided to do a trial run with US-05 at a low temperature. Due to using ale yeast, instead of lager yeast, I’ve decided to call this Pseudo Lager. If it turns out well I’ll look at doing a bigger batch with proper lager yeast.

  • Amber Dry Malt – 600 grams (60 mins)
  • Light Dry Malt – 300 grams (10 mins)
  • White Sugar – 1.1 kilograms (10 mins)
  • Victoria’s Secret hops – 5 grams (60 mins)
  • Crystal hops – 10 grams (flame out)
  • US-05 yeast – about 3-4 grams

This was a pretty basic brew. For a quite some time I played around with the idea of splitting out the hop additions into three, but stuck with two as I wanted to highlight the Crystal hops at the end. The 5 litre boil was for 60 minutes so was able to get enough bitterness (IBUs) from the little Victoria Secret hops at the start. All the amber malt went in at the start. The malt selection was based on what was in the house. Originally I thought there was more light malt, but that wasn’t to be. Light malt was added at the end with the sugar, which was there to keep the finish dry and alcohol up.

Pseudo Lager fermenter

Pseudo Lager done and in the fermenter

Before the boil started I re-hydrated the yeast. I added in a little bit of light malt to try and get some yeast starter going. As this was only for about one and a half hours I’m not expecting much.

Cooling went very well. The process I’ve got to dump a lot of ice directly into the wort seams to work well. Got a bit excited and poured the whole wort in without sieving out the hops. Whoops. Then I realised as I was filling up the fermenter that I forgot the Crystal hops! Uh Oh! So, I just dumped the hops into the fermenter and continued filling it up to 16 litres. I suppose it will be something like flame out/dry hopping. Hopefully.

The gravity reading came in at 1.049 which is exactly what the recipe said it would be. Due to all the sugar in there it should ferment out to finish with a gravity of 1.005. That would be about 6% alcohol after bottling. That’s exciting for a lager.

I deliberately left this in the shed with no heating. The temperature out there drops down a fair bit. Down to maybe 10 degrees Celsius, or less, overnight. Then during the day up to a maximum of 18 degrees Celsius. I’ve left this on purpose to help keep the yeast working at a larger-like temperatures. Not sure if this will do anything other than drag out the fermentation.

After two days the beer is bubbling away. It’s very slowly doing that, but it is happening.

-Mikey

Tagged , , , , , , , , ,

Thomas Coopers Heritage Lager #2 – Review

While Mikey has been quite good with his updates lately, especially with his ongoing Journey to Home Brew story, I have been quite slack.  We hadn’t done a proper brew in a couple weeks (I did bottle the Friedlieb Porter last weekend though), and I’ve just been generally busy/worn out.

Anyway, I got through all of that and had a weekend of home brew!  Not only was a hopped cider AND a stout made, but we also managed to bottle some brown ale, and the remainder of the lager, plus we tried four brews that are finally ready for drinking.  Mikey will be writing up the stout brew and reviewing two of the beers, I’ll write up the cider and reviewing the other two.

So, rather than one huge update with all of this, I’ll be trickling the updates out, starting with the review of the Thomas Coopers Heritage Lager here.

Mikey and I both got the same starter kit that came with the same can of Thomas Coopers Heritage Lager.  We made my can first and followed the directions to simply add a kilogram of dextrose to the wort.  While the beer turned out fairly OK, it wasn’t the most amazing thing either of us ever had.  So since Mikey had the same kit, we decided to try it with some malt rather than dextrose.

All in all, the addition of the malt made for a much better, more well rounded beer.20130707_151143

The beer was a fairly standard lager: there was nothing that stood out or was of any amazing interest.  The body was quite good though, there was a nice finish, and quite a lot of fragrance.

On the nose, there was a ton of fruit and a bit of sweetness.  This fruit continued on the first impression of the taste.  It was almost a passion fruit taste, but without the typical sourness associated with passion fruit.  With this was also the distinct taste of melon.

The beer had very little bitterness to it.  In my opinion, the addition of some bitterness would have been beneficial.  While the fruit was a lot of fun and made the beer light and easy to drink, that’s all there was to it.  With the addition of some bitterness, the dominant fruit flavours would hopefully have been countered, adding a little complexity to the beer.

On that note, the beer tapered off quite quickly after that.

Overall, the beer was simple, but very easily drinkable.  A lager can be difficult to rave about or go to deeply into.  They generally lack complexity and this beer was no exception.  I’ll happily continue to drink it though!

-Chas

Tagged , , , , , , ,

Blondes and Browns, big brew day

Sunday was another brew day at my place and it was big, in many ways.

Newcastle Brown Ale

Newcastle Brown Ale ingredient list and instructions

First up was a trip for supplies from Australian Home Brewing, aka Liquorcraft, aka Brewcraft, aka something-something. We have done a fair few porters lately. They are pretty awesome and good over the colder months, but time for something else for the cold. An English brown ale was what I wanted. Ended up with a Newcastle Brown Ale kit, plus a basic stout kit for another day.

Then back in the Mikey mobile (aka ‘car’) and back to brew headquarters (aka ‘home’) for brew day.

First order of business. Bottle the lager. Final gravity was 1.012 which means the beer will only be 3.8% alcohol, after bottle conditioning. That’s a fair bit lower than what I was going for. Rather than just a cup of dextrose we should if put in half a kilo. That aside, the sample we took was quite promising. Should be a good session beer.

We have been having some over carbonation in a couple of my beers. Nothing horrid, but the IPA and coffee porter (only a couple sample bottles) have overflowed when opened if shaken even slightly. I’ve been using caster sugar for priming and a few people have suggested this might be the reason. That said there’s not a lot of info on the internet about different types of cane sugar. To test this I primed some bottles of the lager with caster sugar and others with carbonation drops. Had a mix of different bottle sizes as well.

After bottling the lager it was time to start brewing. Cracked open one of the Summer Citrus Blonde Ales and got stuck into it. Chas is going to get a review up soon, so I’ll leave it to him.

The brown ale was a mixed kit. There was chocolate malt (200g), a can of light liquid malt, a can of Nut Brown Ale, some Fuggles Hops, and Safale S-04 yeast.
The malt was left to steep for about 45 mins rather than the 20-30 recommended. Mainly because we were trying to do to much at once.

Chas got the liquid light malt in a pot and brought it to the hot break. And I cleaned the fermenter. Hops were added with the steeped grains. The recipe said an optional 400 grams of brown sugar could be added. Only had 300, but it went in. I finally finished cleaning the fermenter just in time for the fresh wort to go in. Last was the can of Nut Brown Ale. Like the lager, we found the liquid a bit to hot. Was a lot more manageable this time round. Finally, yeast went on and airlock.

  • Black Rock Nut Brown Ale – 1.7kg
  • Black Rock Light Liquid Malt – 1.5kg
  • Crushed Chocolate Malt – 200g
  • Soft Brown Sugar – 300g
  • Fuggles Hops pellets – 15g
  • Safale S-04 yest – 11.5g

Have to say that this was a bit of a hectic brew day. Started late and had a huge amount to do. Tried to do too many things at once. Even spilt some of the strained hops back into the fermenter. Luckily it wasn’t much.

The wort smelt great. Gravity reading was only 1.045 which is a bit below what I would expect for the style. Hopefully this yeast brings the final reading right down. Anything less than 4.5% and I’m going to be disappointed. So, a final gravity from about 1.012 or lower will be good.

-Mikey

Tagged , , , , , , , , , , , , , ,

Moving, from small to big

Back when I started looking into home brewing I didn’t know where to start. In my first post I talked about the two types of beer kits I got. I started with the smaller, and slightly more complex kit from Brew Smith. The beer was good, really good. So I stuck with it and made a few more.

Finally time came to do the other kit. The bigger kit. The simpler kit. And I’m worried about the quality. Chas picked up exactly the same kit and the lager turned out rougher than I would have liked.

To try and make sure my version turns out a bit better I decided to replace the dextrose with some liquid malt. Got some advice at Aussie Home Brewers and picked up some Light Pilsner Malt Extract.

The brew was done on Sunday the 2nd and went pretty smoothly. A little too much heat, which wasn’t a huge problem as I really wanted a good original gravity and had to play around a bit. The gravity reading wasn’t exactly where I wanted it, so a cup (75 grams) of dextrose was thrown in at the end.

First few days the beer has been fermenting away as expected. Has slowed down the last 4-5 days and plan to bottle this weekend.

-Mikey

Tagged , , , , , , , , ,

First adventures – keeping things warm

Howdy!

So it’s been about five days since we did the brew I talked about in my last post, and I’ve been relatively happy with the progress.

As I mentioned in my previous post, there was some concern about keeping everything warm enough during the fermentation process.  We were also worried about the morning sun hitting the fermenting tub: the UV can harm your yeast and make generally bad flavours.  To solve these two problems, the brew spent the week wrapped in a blanket:

Beer needs to me tucked in nice and tight when it gets sleepy.

Beer needs to be tucked in nice and tight when it gets sleepy.

This worked surprisingly well.  The yeast manages to produce some of its own heat during the fermentation process, so this blanket kept everything in.  Although my house got as low as about 13 degrees C over night, the wort consistently sat at about 22 degrees C when I checked it in the morning.  It could be a little warmer, but this is still a great temperature. And it was relatively constant, so that’s great.

Another alternative I’ve heard being used is to place your fermenter in an old bar fridge (not on). Refrigerators are extremely well insulated, so this method will keep everything warm (or cool), and more importantly constant.

In warmer months, this method can also be used to keep things cool, just don’t leave the refrigerator on constantly, otherwise things will be too cool.  If you get a fancy enough fridge (or a wine fridge), you may even be able to set it to work at a higher temperature.

Generally, the higher the temperature, the faster the fermentation process is – to a point obviously; if things get too hot, you’ll kill your yeast.  According to the packet, the yeast we used has an optimal temperature range of 21-28 degrees C.  So since the we’re running on the lower end of that scale, the fermentation process will probably take about eight or nine days.

So next step: bottling!  But that’s still a few days away…

-Chas

Tagged , , , , , , ,

First adventures in home brew

Thomas Coopers Heritage Lager

Thomas Coopers Heritage Lager and fermenter

Howdy!

My friend Mikey and I have recently decided to start making home brew. In this blog, we’ll be documenting our brews, sharing what we’ve learned, and hopefully stimulating some discussion and just generally see what happens.

Today, Mikey and I made our first 23 litre batch using a fairly standard starter kit that you can get from most home brew stores. We figured this was a good place to start. The kit came with pretty much everything you need, including a can of Thomas Coopers Australian Lager mix. We made a smaller batch last weekend, but I’ll let Mikey get into that.

These mix cans are a great place to start because it makes the process very easy, albeit probably a little bit too simple. This way though we were able to concentrate on the most important part of home brewing: sterilization.

If you’re interested in getting into home brewing, remember: sterilize EVERYTHING. If any nasties get into your wort, your beer will not turn out. So stay clean and err on the side of caution.

So from there it was just pour the contents of the can into the fermenter with two litres of boiling water – remember, let the can sit in some hot water for about 10-15 minutes, it makes it pour much easier. Pour in some dextrose, fill the the fermenter to 23 litres and you’re pretty much done.

When filling the fermenter, make sure the water is at about 20-25 degrees C before pitching your yeast. And of course make sure everything is stirred thoroughly.

Before pitching your yeast, make sure to take a hydrometer reading to get the original specific gravity (OSG) of the wort. Today we got an OSG of 1.038. The higher the OSG, the higher the alcohol content of the final brew. 1.038 is not terribly high, but it’s pretty good, and we should get a final alcohol content of about 4.5-5.5% or so.

Following that, pitch your yeast, stir that in, put the lid on the fermenter, place your airlock and you’re done… The whole process took about 45 minutes, not counting some initial cleaning and sanitizing.

The instructions said that the fermentation process should take about 6-8 days, but we’re anticipating longer as it’s a bit cool at the moment. Once all of that is done, it’s time for bottling!

While we wait, Mikey has another fermenter at his house as well as the same Coopers kit we used today. Rather than adding the dextrose supplied, we’re planning on using a malt extract to bring out a little more flavor. We’ll report in after we brew that.

-Chas

Tagged , , , ,