Category Archives: Home brew kits

Flotilla Pacific Pilsner – Review

About a month and a half ago Chas made picked up a beer kit for a pilsner. Went around and we brewed up what was hopped to be a refreshing light flavoured beer for summer.

Don’t have much details on the brew day other than it was back on 5 October. Plus Chas has been focusing on his site Brew In Review. There’s a while bunch of beer reviews, mainly Australian. Also has some bits on festivals, pubs & bars, conversion beers and other beer related things. There’ll be a piece from me my conversion beer in the next couple weeks.

Flotilla Pacific Pilsner tasting

Flotilla Pacific Pilsner ready for tasting

Enough cross promotion, onto reviewing this beer. And it’s a big flavour beer.

First thing you notice is that it has plenty of citrus aroma. Huge amounts of lime and good serving of mandarin as well. The the taste, heaps of that citrus comes out in the flavour as well. Big lime and mandarin. Grapefruit as well, along with the bitterness towards the back. Hints of peach in there too.

I had this really cold, around 4° Celsius. As it warmed up the grapefruit and bitterness really started to come out. There’s also some stone fruit flavours that start popping up towards the end.

For food matching I would go for something like Vietnamese, Thai or Chinese. Just about every dish from the fresh to deep fried would work. The fruit keeps things moving and the bitterness cuts through.

This is a good beer. Nothing mind blowing, but quite enjoyable. It’s not really a pilsner as it was made with ale yeast. But it is zesty and fruity. Will be enjoying these over the hot days of summer.

-Mikey

Tagged , , ,

Bottling Super Stout, with a mistake

I finally got around to bottling the Super Stout. I’ve been waiting for some extra fermentation which hasn’t really happened. I was by myself and made a mistake. I knew at the time that maybe it wasn’t a great idea and did it anyway.

Super Stout bulk prime

Bulk priming the Super Stout from fermenter to pot

The gravity reading on the stout hadn’t really dropped from the reading I took three weeks ago. Back then it was 1.031 and it finally ended at 1.028. That’s not a lot of movement over three weeks. The extra temperature may have helped ferment a bit more, but not sure if it was really worth the extra wait.

Bottling 18 litres of beer by myself was never going to be fun. That’s one of the reasons I had put it off for so long. I wanted to put most of the beer in 330 ml bottles as well which was going to drag it out longer. My bottles are washed and clean before I put them in storage. All I needed to do was sanitise them and put them on the bottling tree to dry a bit. Pretty straight forward once I put the rest of the bottling tree together.

I’m use to bulk priming I didn’t want to go back to individual priming. That meant I needed to measure the take sugar and dissolve it in a little bit of water. That was simple. I had the dissolved sugar in my new(ish) 19 L pot and racked off the beer from the fermenter to the pot. That went really well.

Now I had all my beer primed and ready to bottle. And in a huge pot. How to bottle from here? I could syphon it out one bottle at a time. That would take forever and I didn’t have the time. I could transfer to one of the fermenters with a tap and use a bottling wand. Not the big one as I don’t have time to clean. Little one is good to go, but a bit small. Split it into two lots would work. What’s the easiest way to move it from the pot to the small fermenter? A siphon us a smart choice. But what did I choose? Pour it in. What was I thinking?!

Super Stout bad idea

Pouring the pot to fermenter? That’s a bad idea

There was a but of a mess when I poured the beer out if the pot. Most went into the fermenter. Lost about 500 ml to the floor and side of the fermenter. Second lot was less messy. The real problem is that by pouring the beer it got aerated. And according to John Palmer’s book How To Brew that it’s likely going to produce diacetyl flavours. Not good.

The rest of the bottling went pretty well. I did under estimate how many bottles I would need. Total count was 35 stubbies and eleven 500 ml bottles, a total of just over 17 litres.

After bottle conditioning the alcohol should be 5.2% which is below what I would like for something called a Super Stout. Would expect something close to 8%, but I knew from the original gravity that want going to be possible.

I didn’t taste the beer when bottling. I had tried it a few times with the gravity samples over the past few weeks. Quite dark and the liquorice flavour changed enough for me to notice between sample one and the last one. There was a good hint of apple aroma from the beer once primed and in the open pot. I really hope that doesn’t come through in the beer.

I’ve included what temperature settings were used. You can see that I raised the heat a fair bit in a futile attempt to ferment more sugar. I’m fearful that it might have caused a negatively effected the beer.

  • OG 1.064 (3/5/14)
  • ferment at @ 16 C = 1.031 (to 28/5/14)
  • then @20 C = 1.030 (to 1/6/14)
  • then @ 24 C = 1.029 (to 9/6/14)
  • still @ 24 C = 10.28 (to 14/6/14)

If you’ve got any feedback on the above is love to hear it. Both the temperature changes and the pouring/aeration of the beer.

-Mikey

Tagged , , , , , , , , ,

Really dark, and still not ready

Super Stout gravity reading

Super Stout gravity reading at 1.031

It’s been three and a half weeks since the brew day for the Super Stout. I deliberately left this to ferment at a lower temperature, 16 degrees Celsius. There were two reasons for that. First, Good Beer Week was on last week and there was no time over the weekends to bottle. Second, wanted a really clean yeast finish to the beer.

Fast forward to now. Went out and took a sample of the beer. Gravity reading came in at 1.031! What? I’m pretty sure that’s no where near where I thought it would finish. Yeah, there’s all sorts of stuff in there like lots of super dark malt and liquorice. But I really thought this would drop more. And I still do.

Rather than wait another 2-3 weeks I’ve set the temperature to rise to 20 degrees Celsius. I’m hoping the yeast will wake up and have another crack at eating some of that remaining sugar. If that doesn’t work, I might need to pitch some more yeast in. Which is something I’m not took keen on.

The sample tastes quite sweet still. And that should mean there’s still more sugars for the yeast to eat up. There’s also a really strong molasses taste which ends with liquorice taste. Now I know what the liquorice does. The sample is also super dark, just as the name suggests.

So, temperature up and give it another week and a half. Hope it’s ready by then. If not… well, we’ll cross that bridge if we come to it.

-Mikey

Tagged , , , , , , ,

Back to black, brewing Super Stout

Back from holidays. Back to brewing. Back to black.

Yep, Saturday was the first weekend back from a two week holiday overseas. It seamed like a perfect idea to get Chas over and brew again. Plus we were able to do another dark brew. Super Stout was the brew for the day, and is was very dark brew indeed.

Super Stout 1

Super Stout 1 in the fermenter waiting to be topped up with water

Last dark brew I did was the Baltic Porter #2. That was back in November, nearly six months ago. That’s running very low and will likely be all gone by the time the Super Stout is ready to drink. The weather is getting right for stouts and porters, it has already gotten pretty cold here in Melbourne. But that might have more to do with the temperature difference between the holiday overseas verse back home.

The brew day was a simple and easy one. Did a kit from Brewcraft / Liquorcraft / Australian Home Brewing… I’m always getting confused by their name. I’m just going to continue to refer to that company by their official company name, Australian Home Brewing Pty Ltd. Anyway, the kit was their Super Stout. Got this one as a gift for Christmas. Didn’t want to wait much longer before using the ingredients. Apparently liquid malt can go a bit funny if it’s been in a can too long. Yeast was fine as I kept in the fridge since December.

The kit comes with everything you need.

  • 1.7kg can of Black Rock Miners Stout
  • 1.5kg can of Black Rock Dark Liquid Malt Extract
  • 500g Corn Sugar
  • 10ml liquorice extract
  • Safale S-04 (whole 11g pack)

A fairly simple kit and very easy to make. The liquorice was unexpected. I’ve seen it as an ingredient in home brew shops before but wasn’t game to try myself. Given that it’s included in a lot of stout recipes I’m sure it’ll be fine. We’ll wait for the tasting review.

Process for this brew is very simple. Boil 2-3 litres of water. Heat off. Add both cans of liquid malt. Add corn sugar. Stir until dissolved. Add to fermentation vessel. Top up to 18 litres. Add licorice. Stir up really well. Gravity reading. Pitch yeast. Done.

The whole brew was all done in about an hour. Topping up the water was nearly the longest process. There was plenty of ice and ice cold water ready to chill. The delay was getting the rest of the water filtered. The water quality isn’t the best here due to the pipes. There is only one filtering jug and it takes time. Might need to prepare that better next time.

Gravity came in at 1.064. That’s pretty good. The instructions pack said final gravity would come in around 1.025 – 1.030. If that’s the case I’m looking at a beer that will be around 5.0% to 5.6% after bottling. That’s okay, but was hoping for something a bit higher for a stout. I drank some of the gravity sample and it tasted great. Dark and sweet, exactly what you’d expect.

There was some beer tastings as well. Cracked open a bottle of Chas’s basic pale ale. Also tried my Australian IPA. Both reviews should make their way up over the next week or so.

Overall it was a relaxed brew day. Nothing complex. Nothing boring. Nothing special. Two guys making a beer and taking it easy. Nice.

-Mikey

Tagged , , , , , ,

Imperial Red Ale – review

Back in January Chas decided to to do a big batch of the Iron Curtin Imperial Red Ale. It was in the middle of a bit of a heat wave in Melbourne and the brew could have ended up quite a mess. The beer had a bit of steeping grain for flavour, liquid malt kit, extra liquid malt, some dry malt and a bit of hops for extra kick. Although it was a kit a lot that went into it. Fast forward four weeks in the bottle, it was time to do a taste test.

Iron Curtain Imperial Red Ale

Three glasses of Iron Curtain Imperial Red Ale ready for drinking

The smell is about exactly what you would expect for a red ale. There’s that rusty malt and sweetness aroma. Quite a solid aroma, too.

Flavour comes on with a build up which works well. Amber malt flavours building with the slight spiced hops. It’s balanced really well and works a treat. The beer is big and there’s a feeling like your mouth is full of flavour. A hint of sweetness sits behind the main parts. At the end it gets a little less balanced with the bitterness finally overpowering the malt. Just at the very end there’s a bit of funky tart flavour, probably due to the yeast.

For food matching is pretty easy. If you come home after a long day, work or whatever, and you’re really hungry you have something that fills you up. Whatever that food is, this beer will match it. This is that beer for your wholesome meal. And it’s also a beer to slowly drink on a lazy night.

I’m pretty impressed with this beer. It was a kit, and I’m always a bit uncertain if they turn out they way you want. This one worked well. Quite well. I suspect these will dissapear pretty quickly.

-Mikey

Tagged , , , ,

Another brew day – Imperial Red Ale

We’ve had a bit of a heat wave lately so I’m not sure why I decided to brew up a kit of Iron Curtain Imperial Red Ale from Brewcraft, but I figured by the time it’s done the weather should have cooled a bit.  It’s a 23 litre batch as well so it will last me into the autumn when it’s a little more appropriate.

Anyway, we started out bottling the Red Dog Pale Ale that we made a couple weeks ago.  For those who remember, we didn’t get the sugars out of the mash that we were hoping for, but things turned out OK.  A lot of fermentation happened and we got quite a low FSG, so the beer should be of a decent strength and quite sessionable.  It did taste a little thin and a little over hopped – simply not enough malt in there I suppose.  The previous batch tasted a little thin though so hopefully it will beef up with some conditioning.

So, back to the Imperial Red Ale brew…

This was a pretty good extract brew.  Not too simple but fairly cruisy which amounted to a good brew day over all.  The kit contained:

  • Mangrove Jack’s British Series IPA
  • Can of liquid malt extract
  • Light dry malt extract
  • Crystal grain
  • Fuggles hops
  • US 05 ale yeast – the Mangrove Jack’s kit came with yeast but I don’t usually use kit yeast

We kind of jumped right into it so I forgot to take measurements of everything… oops!  I guess I was excited about this brew.

As I mentioned, this one was pretty simple.  The crystal was steeped for 30 minutes then a quick boil was started.  With the boil going the hops were added for five minutes.  After the cold break we threw it in the fermenter, added the Mangrove Jack’s, the LME and DME, topped it up to 23 litres and we were done!

I like kits like this.  While a partial or a full mash is a little more in depth, these are easy enough to spend a couple hours on over the weekend, but a little bit more than just pouring a can of concentrated wort into a fermenter, adding water, and then being done.

The wort tasted great.  There were lots of hops in there and, with an OSG of 1.057, I think this is going to be a really robust beer.  Mikey thinks I should dry hop it but I haven’t decided yet…  I need to decide soon though!

We’ll report back in a few weeks to tell you how it is!

-Chas

Tagged , , , , , ,

Return of an old kit, now colder

Sunday was brew day at my place again. Yay! I’m enjoying the small batches and this was another one.

First up was bottling the Australian Wattle Pale Ale. Got pretty carried away and nearly forgot to take a sample for the final gravity. Was happy with the final reading of 1.014 which means it will be 4.2% ABV after conditioning in the bottles. The sample for gravity was also our sample. Have to say it was very rough and bitter. Might need more than the regular two weeks conditioning.

Worth nothing that this was the first beer that I’ve had proper temperature control. The sensor was attached and set at 22°C. There is one degree buffer range on the sensor. This meant brewing temperature was kept between 21.0°C and 22.5°C. That top range estimate as I wasn’t constantly checking. I wasn’t even checking that often. Anyway, point is that there was some control on this fermentation.

After all the bottling was done it was time for the next brew. This time it was a return to the BrewSmith Hoppy Heart IPA. I quite liked the last batch and wanted another lighter flavoured beer before trying the Baltic Porter again.

Hoppy Heart and Aussie Wattle

Hoppy Heart IPA in carboy in blanket and Aussie Wattle Pale Ale in bottles.

Had fun with this brew. Read the instructions before starting, after the mess that was the Pale Ale. The kit was straight forward and everything went to plan.

Did a couple extra things. For the steeped grains did a sparge to rinse out more flavour, colour and sugars. Thus gave a slightly darker beer but should be more flavour.

Also played around with the cold break. Used two 1.25L bottles with frozen water as ice blocks to cool the original water. This worked well. Also added about a litre of chilled water direct to the wort. After ten minutes changed over the water. As part of this I poured the near-frozen water into the sink for the bath, and topping up the bottles with tap water to continue the chilling effect. The wort wasn’t chilled enough enough after another 10 minutes. So a third bath was required. It was only now that I realised there were two trays if ice specifically prepared. They were thrown in. As a result the temperature dropped too much and there was too much wort.

The wort only just fit into the carboy. A lot of shaking later, for oxygenation, we took a sample for gravity. It came in at 1.064 which is quite alright. Yeast was pitched and put away with temperature set at 21°C. So, should ferment at 20° to 21.5°.

The day went well. Bottling and brewing on the smaller scale if things is nice. Plus return to a nice beer that was chilled, and will be fermented, cooler than before.

– Mikey

Tagged , , , , , , , , , ,

Making beer at home, again.

It’s been too long. Way too long. Last brew day for me was on 1 September!  Over a month between brews. Just over six weeks!

In my defence there were a lot of things going on. The bottling day that was meant to include a brew was just bottling as I couldn’t sort out a time with Ian. Plus the only brew I was set up to do would of been another 23L batch and that wasn’t smart as I had just run out of bottles.

Then a whole lot of important-life-things happened. This isn’t really the place for that stuff, so I’ll just say home brewing had to take a back seat.

Aussie Wattle Pale Ale

Aussie Wattle Pale Ale on the stove.

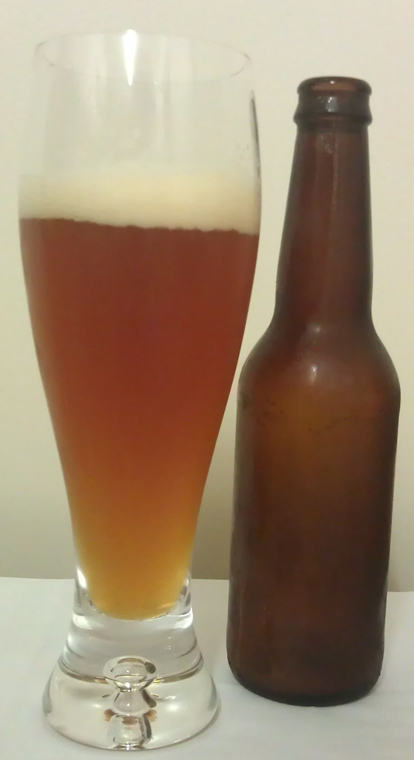
Anyway, I finally got back to brewing and there’s nothing like something relatively easy to get you back into it. I ordered a couple kits from BrewSmith. The was the IPA which have done before, and is good as it has dry hopping. Also picked up the new Aussie Wattle Pale Ale, for this brew.

Kit was simple enough but still managed to make a couple mistakes. We kind of jumped in a little to quick into this. Which is odd because I prepared a whole lot of stuff before Chas turned up. Kit contained:

  • Dry Malt Extract
  • Grain (mixture of stuff) for steeping
  • Wattle Seeds
  • Hops x3
  • Yeast

First mistake was not adding the Wattle Seeds to the grain when we put that into steep. Just clean overlooked that. Only missed a few mins, so hopefully that doesn’t change things much. Used a grain bag and tried to shake in the seeds, not sure if that really did anything.

Next up, the grains steeped longer than the 30 mins. This was two fold. One, it went on early and the boil wasn’t ready as quickly as I though. Second, we didn’t put the steeped liquid into the boil when we were meant to. Again, oversight by not reading the instructions from top to bottom.

So, Wattle Seeds went in late. But steeping was longer, about 50 mins rather than 30 mins. That meant it only had 5 mins in the boil rather than 15 mins. My gut tells me that this will make a difference as the (middle) hops didn’t have as much to be absorbed into . This might mean a lighter hop flavour and more aroma hops. But that’s just a guess.

Finally there was the cold break. I’ve been reading up a lot on brewing lately. Will be sharing some of that stuff once I get back into the 101 pages. Yes, I know they’re well overdue. I might move to fortnightly rather than weekly as there’s only a few more ‘basics’ to cover before diving into heavy detail.

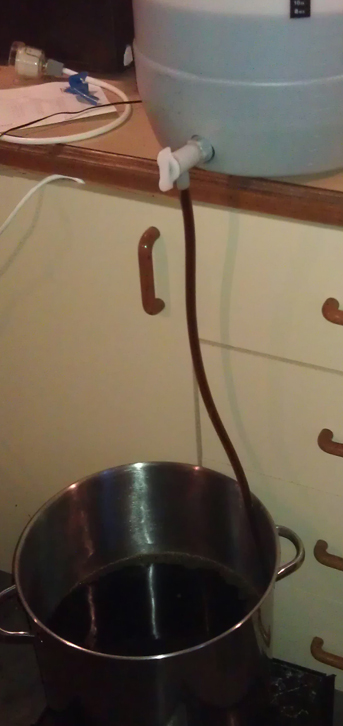
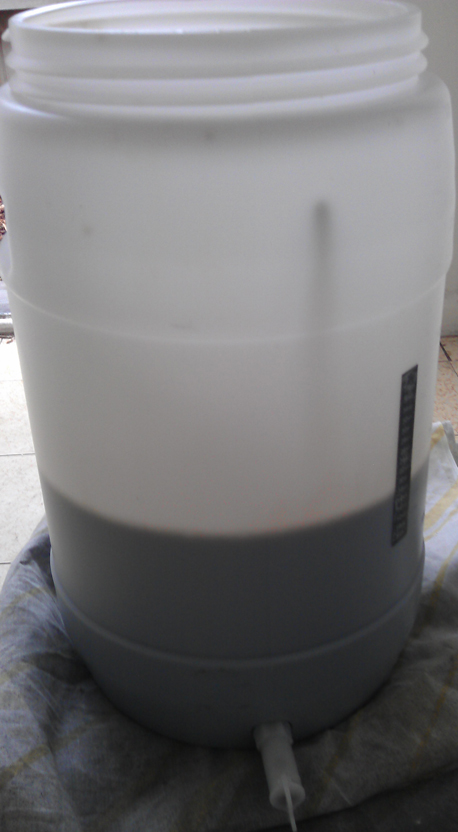
Where was I? Oh yeah, the cold break. To really get a good break without fancy equipment I decided to step up the work on the cold bath. Yep, still doing that as don’t have any funky equipment. First up was two 1.25L soft drink bottles that were full of frozen water. These acted as giant ice cubes in the ‘bath’ water to cool it down. Then also dropped in a tray of ice direct into the wort, it’s okay the water was filtered. Still did the second bath, but no extra ice into the wort. After that transferred the wort into the carboy, while straining out the hops.

The temperature was still up a bit so put the carboy in the big boil pot and filled with ice cold water, from those bottles that were used as ice cubes earlier. After about 10 mins half the carboy was cold and the rest warm. Pitched the yeast and shaken up, for airation.

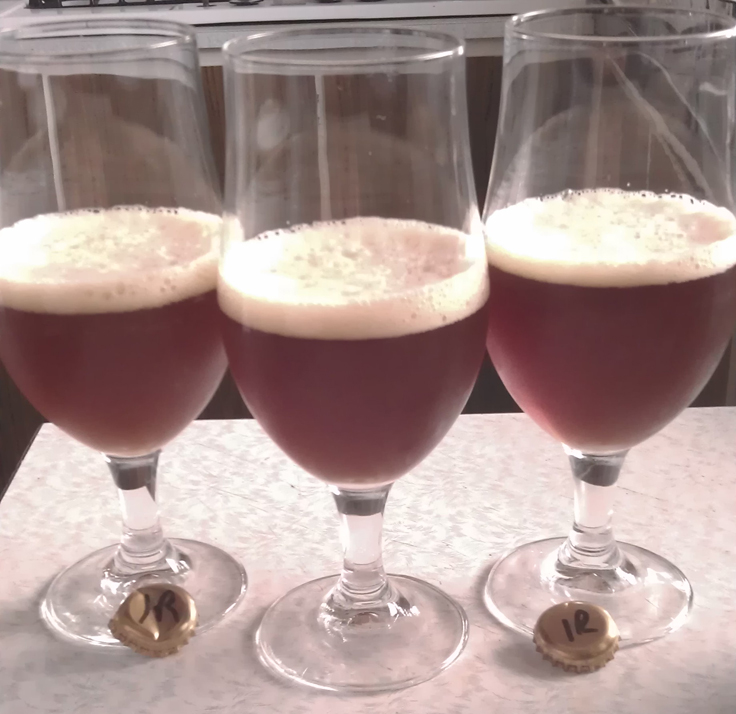
The OG came in at 1.042 which was a little lower than I expected for a BrewSmith kit. That might be due to the stuff up with the steeped grains going in late. Or maybe too much water added. But it could just as easily be the right OG.

The day was a pretty short with no bottling to do. And that was really nice for a change. Final thing for the day was getting the temperature control set up, but I’ll cover that in another post.

-Mikey

Tagged , , , , , , , ,

Brewsmith Honey Bomb Wheat Beer

Beer!

Mikey and I finally got around to making the Brewsmith Wheat Beer last weekend.  Mikey isn’t usually a wheatbeer fan, so he’s been avoiding this one.  I finally made the executive decision to get the kit.  I told Mikey I was going to make it with or without him.  Although it was a wheat beer, we were still making beer so Mikey decided to join in.  It was a good choice.

This was the standard Brewsmith kit, except unlike the other kits they do, there weren’t any specialty grains to steep.  The kit was:

  • What looked like dry malt extract, but there was probably some other stuff in there too
  • Bittering hops – 60 minute boil
  • Taste hops – 20 minute boil
  • Aroma hops – at the end of the boil
  • Honey (not supplied) at the end of the boil was optional

The good and the bad of this kit is that it was very simple.  I like Brewsmith kits because there is enough to do, but it’s still simple and easy.  I think its the grain steeping that does it.  Unfortunately with no speciality grains, it may make things a little too simple.  Simplicity isn’t a problem in a larger batch, because there are other concerns there, but on a smaller batch it is possible to make things too simple!

I think this kit would be a good introduction to the Brewsmith kits, especially for those who have only done can and kilo style kits and want to slowly move to something more complicated.  Since this kit has hops additions, it’s a good halfway between steeping and the whole kit and kilo thing.

Tomorrow Mikey and I will be trying the new Brewsmith recipe (hopefully!), so he’ll report in soon.

-Chas

Tagged , , , , , ,

Back to brewing after a holiday

I’m finally getting around to writing up last week’s brew!  It’s been a busy one for me…

After taking inventory last week, I’ve been spending all my down time trying to get through my collection; I need bottles for the batch that I made last week!

Anyway, as mentioned by Mikey, the Beagle Double IPA turned out to be a big beer.  It was great, but big.  Like most beer drinkers, I’m a big IPA fan, so although I like something like the Beagle, having a lighter and easier IPA on hand (especially for the upcoming summer) seemed appealing.  Since I hadn’t been brewing for awhile, I also wanted to get back into it with a really simple kit.

So Mikey and I went down to Brewcraft in Richmond to see what was available.  We picked up a bag of Mangrove Jack’s IPA wort and a kit converter.  Of course you put Mikey and me in a home brew store and we also both end up walking out with a bunch of other stuff that we “need just in case.”  This is why I have so much sanitiser.  But hey, we all know the Rules of Home Brew.

Anyway, it was a pretty simple brew containing:

  • Mangrove Jacks India Pale Ale
  • Blend of light and dark DME
  • Cascade hops
  • American West Coast Ale Yeast – BRY 97

Pretty simple stuff here.  Note that the Mangrove Jacks wort came with yeast included, but I generally prefer to buy yeast separately because you never know the quality of the included yeast.  The wort was also on sale because it was near its use by date, so once again, you just don’t know…

All we had to do was boil two litres of water, add the malt, and let that dissolve.  After that, we threw in the hops and let that steep for about 15 minutes.

This was then strained into a 30 litre fermenter with the Mangrove Jacks wort added as the fermenter was topped up to 23 litres.

Done and dusted!

The Cascade hops is a pretty middle of the road all rounder.  Plenty of spice in the smell with a bit of grass (at least for me).  I can sometimes find a little bit of chilly in there as well.  Of course there are also the typical florals found in a lot of hops as well.

I considered dry hopping, but then couldn’t really decide what to dry hop with.  Plus I want this to remain pretty light…

In the end, the wort smelled and tasted great.  It should turn out to be exactly what I want through the summer.

We’ll bottle next weekend and then see how it turns out a couple weeks after that!

-Chas

Tagged , , , , , , , ,