Tag Archives: Beer

Dark Dead Guy Ale

Well…

It has been an exciting week!  It was Good Beer Week, which meant lots of great stuff to try around Melbourne.  I’m not quite as hard core as Mikey, but I still managed to get more than a few brews under my belt.  Although this site is technically home brew related, if we get lucky Mikey may talk about Good Beer Week.  We’ll see!

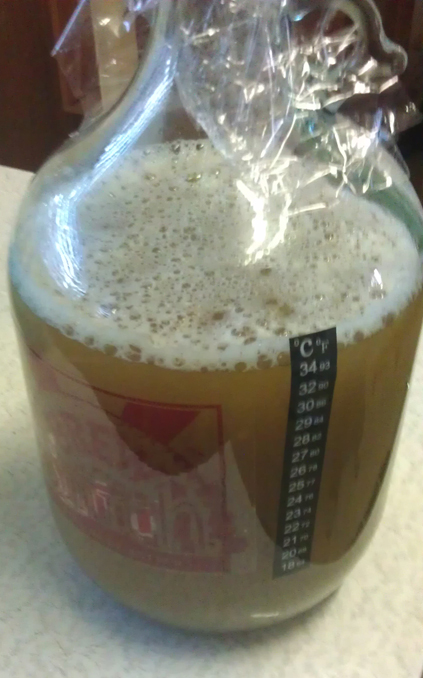
However, I still managed to make some home brew: Dark Dead Guy Ale from Australian Home Brewing.

This kit was pretty cruisy, but quite fun.  It called for a 30 minute boil of some hops and then just mixing that in with a kit can and some malt into a 30 litre fermenter.

The Hops

The kit included two hop varieties: Perle hops (alpha 6%-10%) and Saaz Hops (3%-4.5%).

Now, I’ve still got A LOT to learn about hops, but it was great to be able to smell the difference.  I’ve included the alpha acid levels above mostly so that when I do learn more about hops, I’ll have a reference!

The Perle was the taste hops, and about 14 grams of that was thrown in for the 30 minutes.  Much to my housemate’s displeasure, this filled the house with the lovely smell of hops.  Perle has a great spiciness about it, and it was a pleasure to stand over the stove breathing in it.

At the 25 minute mark, I threw in anotheLast five minutes of the boil - all hops added!r 14 grams of the Perle as well as 10 grams of the Saaz.  These late additions were for aroma.

Last five minutes of the boil – all hops added!

It was amazing how the Saaz changed up the smell entirely.  I found that although I found the Perle a bit spicy, it had a lot more bitter to it in smell.  The Saaz, on the other hand, was much spicier, and less bitter than the Perle.

They had their own complexities too, and now, upon writing this, I realise I should have taken some notes… Anyway, it was very interesting how the aroma changed quite abruptly upon adding the Saaz.

Following that was steeping for 20 minutes.

The Rest of It

While all that was going on, the contents of the two cans went into my (sanitised) fermenter and were stirred together with some water.

The rest of this is child’s play.  Pour the hops through a strainer, top up to 21 litres, getting the temperature into the 18-24 degrees C range, take a gravity reading, then pitch your yeast.

For those who are curious, the yeast that was supplied with the kit was a BRY97 American Westcoast Ale Yeast.  No surprises that I used an ale yeast to make an ale…

20130526_155852The original specific gravity was 1.040, so, as with the last big batch, we should get something between 4.5%-5% after bottling.  Maybe something a bit higher.  Although the OSG is a little higher than the lager, I don’t expect to get as low an FSG as I did with the lager since this one is generally just a thicker beer… we’ll see.

The wort was a little interesting in taste.  The hops was quite bold, and, I have to say, a little confronting.  Not confronting in “oh wow, that just opened my eyes to a new world,” no, it was confronting in a “oh wow, that hobo isn’t wearing any pants” kind of way.  Maybe not that bad…  I think it will settle down in the fermenter.  Then I want to give it at least a month in the bottle.

Finally, I was a bit worried at first because things didn’t start bubbling for quite a while.  I gave the fermenter a squeeze and things were definitely sealed up, so I was a bit concerned.  To my pleasure when I got home from work today, it was going nuts!  Probably the most energy I’ve seen in an airlock since I’ve started.

This is an excitable brew…

-Chas

Tagged , , , , , , , , , , ,

A malt explosion!

So I ordered a home brew kit from Australian Home Brewing.  I love ordering stuff online.  I don’t get much mail apart from bills, so it’s great to come home to a package on the doorstep; this is even better when the package contains home brew supplies!

Anyway, with much excitement, I opened my package, and, to my horror, found that the liquid malt container had broken in transit!  There was malt everywhere throughout the box, a total sticky mess.

Liquid malt everywhere!

Thankfully malt cleans up pretty easily with hot water (there’s a tip), so the other contents cleaned up pretty well. Unfortunately much of the malt extract was lost.

These things happen I suppose, but of course it’s disappointing to open a fresh box of home brew supplies to find your malt all over the place, and the rest of your ingredients all sticky.  When I moved it, some of the extract managed to drip through the box as well, getting malt throughout the house.  The dogs were quite pleased with this and helped with the clean up though.

Well, I sent a quick email off to Australian Home Brewing and they sent me a replacement malt right away.  They also threw in some liquor mix for the trouble, which was extra nice of them.  I would have been happy with just a replacement malt extract!

To make things even better, I managed to recover a little bit of the malt, probably just enough to throw into a small experimental batch in my 5 litre carboy.  It’s not enough for a full 23 litre batch, but enough to play with.

Moral of the story? When God gives you ruptured malt packages, make beer out of it!

Oh, and course the replacement was mailed to me as well, so I had the pleasure of coming home to another package.

– Chas

Tagged , , , , , ,

Hoppy Heart IPA – review

So we finally got to taste the Hoppy Heart IPA from Brewsmith that we brewed a few weeks ago. You can check out the post on the brew here.

The only problem with brewing is that it requires patience, which is something I don’t have.  You make your brew, wait while it sits in the fermenter, bottle it, then wait again!

Why not just go to the bottle shop and get something that’s already been made for you?  Well, that’s a whole lot less fun and you wouldn’t have the satisfaction of knowing it was something you’ve made yourself.  Also, home brew is tasty, and this IPA was no exception.

Hoppy Heart IPA #1

Hoppy Heart IPA #1

Firstly, I want to make a very loud shout out to the guys at Brewsmith.  It seems they stumbled upon this humble blog and posted an earlier review on their Facebook page.  I suppose it’s good for them to be showing potential customers that they make good beer, but it’s nice to be getting extra readers too, so everybody wins!  I know we refer to Brewsmith quite a bit around here, but just in case we forgot to give a link, here it is: http://brewsmith.com.au/ – that’s for all y’all who don’t know how to use search engines…

So the first exciting part of the weekend was getting some extra readers.  The second exciting part was trying the IPA while making some beer.

Well first of all, the colour was great: fairly dark with lots of body and head.  Mikey was doing a bit of a “yay we get to taste the IPA dance” prior to opening the first bottle, which made it get shaken up, so after dealing with that mess, we got to try the beer.

Getting ahead a little, but talking about the body of the beer, it seemed to have a bit of a creamy or oiliness about it.  It was a pleasant feeling, and I can only imagine that it may have come from the oils that come from the hops, but that is only a guess.  All in all, it added to the body of the beer.

In regards to smell, it was exactly like an IPA should smell like, fruity, hoppy, just generally nice. When drinking, I really got all the different levels of hops: aroma hops, taste hops, and bitterness hops.  The flavours were distinct, but together at the same time.  It was quite nice.

IPAs are most famous for their hoppy/bitter flavour, and this was no exception.  That being said, I’ve had some very bitter IPAs.  While I love lots of hops, this can be a little overpowering at times, and I can often only have one or two of these before I move on.  This was not one of those, rather, it was a bit more balanced and much easier to drink.

Adding to this was the fruitiness, which counteracted the bittering hops very well.  Sometimes one wins out, the fruit or the bitter, but this IPA had both at neither extreme.

As I finished the beer, I really began to notice the bitterness staying in my mouth, which is a lovely side effect of an IPA.  So the taste really stayed, which is great.

All in all, we were quite pleased with how this came out.  As with the Brewsmith porter we made a while ago, this beer was very easy drinking.

And finally, since the last review requested that I recommend food…  My first instinct would be to just enjoy this beer on its own.  It was very refreshing and good just for its own sake.  The bitterness in an IPA can push out other flavours, so it may not go well with something that’s less than bold.  So if you must drink it with food, drink it with something that will hit you just as hard.  Keep in mind that the beer also has fruit flavours as well.  A dry curry would go well, or perhaps something Mexican is what I’d go for.

– Chas

P.S.  and since this was an article about an IPA, here is a short list of hops related puns I wanted to include, but felt would be inappropriate in the main review:

  • We were very hoppy with how the beer came out.
  • When drinking the beer, I said “hip-hop-hooray, that’s good”
  • Something about rabbits?
  • Hop on the bandwagon, drink some IPA.
  • I got hopped up on some tasty home brew.
Tagged , , , , , , , ,

Summer Citrus, first attempt

Summer Citrus in fermenter

Summer Citrus Blond Ale #1 in fermenter. Just before yeast added.

Didn’t look like we were going to be able to do a brew last weekend. But shuffled a few things around and did a brew on Saturday. Another Brew Smith kit, this time the Summer Citrus Blonde Ale.

Was expecting another partial boil with grain, needing two pots. Not the case. This was a simple one with malt, hops and extras added straight into the wort. Two lots of malt, three hop additions, coriander seeds and lemon rind. Yeah, I was thinking the last two were a bit odd. But hey, it is a citrus blond.

Did add in a bit more water than meant to at a couple of stages. For example washing out the malt bags to get all the powder out, and into the wort. For this one had to grate lemon rind in. We did it directly over the pot and used some boiled water to rinse the bits off the grater. Anyway, as a result we didn’t need to do any extra top up of water into the glass carboy fermenter. A side effect was that the wort was about 29 degrees Celsius. Plastic wrap went over the top of the carboy until the temperature could be dropped. The photo above was taken at this point. Extra cooling was done, but after another 20 minutes we could only get it down to 27 C. Not ideal, but needed to get the yeast in. Airlock went on and stored away to brew.

This is the second time we got a proper gravity reading on these small batches. Came out at 1.054 which is more or less in the range I was expecting. Means the beer will be around 5% to 5.5% alcohol, if all goes well.

We’ve done a few of these Brew Smith kits now and this was the easiest by far. Bottling will be in about two weeks, just after good beer week (www.goodbeerweek.com.au). Then another two weeks in the bottle before tasting and review.

Tagged , , , , , , , , , ,

Brewing, it’s in the blood

So I got an interesting story from my grandmother recently…

According to her, my great grandparents brewed their own beer and spirits during prohibition times way back when!  Unfortunately my grandmother couldn’t remember too many specifics – I doubt my grandmother would have been born yet by this point either.

Supposedly, my great grandparents were brewing in their apartment’s bathtub, which was relatively common during prohibition days

Everything was going well until their brew started leaking into their downstairs neighbours, which I imagined put at least a temporary stop to things.  What lucky neighbours though to be getting free beer dripping from their ceiling!

Anyway, things finally stopped once prohibition laws were repealed.  Oh well!  At least I can say I have tradition of brewing in my family.

-Chas

Tagged , , ,

Chocolate Paradise Porter – review

Chocolate Porter #2 tasting

Chocolate Paradise Porter #2 for tasting.

Howdy!

Well, as Mikey mentioned in his last post, we tasted a porter that he brewed a few weeks ago.  We had the drink while bottling an IPA from Brewsmith that we made about two weeks ago, and then followed by making yet ANOTHER Chocolate Paradise Porter.  So, following the first and second rules of home brew, we had to be drinking home brew.  Why not kill two birds and do a tasting at the same time?

I’ll start at the beginning: the taste before bottling.

It’s important to taste your beer before bottling to make sure that there is nothing funky going on.  It lets you know that it’s turned out OK and gives you a general idea of how things will turn out.

However, prior to bottling, the beer has generally been sitting at a fairly warm temperature (optimal for yeast) and is most definitively flat.  So yes, the first taste is a taste of a warm, flat beer.  The beer also hasn’t been given a chance to fully mature, so it’s far from done.

Prior to bottling, the smell was near perfect.  The chocolate really came out and there was a little bit of smokiness to it.  Exactly what a porter should smell like.

The first sip, however, was interesting… it had a sourness to it that although wasn’t bad, wasn’t good.  It didn’t taste like it was off or infected, but the sourness gave us a bit of a worry.  We figured the beer would lose this strange aspect after some time in the bottle.

The first (second and third!) bottle:

The nose didn’t change at all.  There wasn’t anywhere for it to go really.  It was still smokey with a bit of chocolate.

In the first few sips, there was still a hint of sourness to the brew, but it seemed to come from the carbonation.  The carbonation was a bit strange, and it seemed to sit on my tongue a bit.  Obviously carbonation is a good thing, but I don’t want it to be something I’m acutely aware of – especially in a porter.

Fortunately, this weird carbonation thing went away after the beer was allowed to breath for a few minutes.

The chocolate flavours were there, but overall very subtle.  The chocolate came through in the nose much more than in the taste.

What really came out in the taste was the smokiness.  It was great, although dominant. Unfortunately this meant that the any complexities in the beer were taken away somewhat.  This left us with what was still a great porter, but with nothing that stood out except for the smokiness. Please don’t get me wrong, this is far from a bad thing.

I had a few bottles of this, one served at what was probably the optimal porter temperature, one served a little cooler, and one served at temperature too cold for a porter.

Overall I think I liked the coldest one best.  I think that this was because I found the beer surprisingly light and refreshing for a porter.  Beer is always great and refreshing, but there are different styles for different times.  This porter was surprisingly light and quite easy drinking.

So overall, the beer turned out great.  Usually I can spend a little bit more time on a porter, but this one went down far too easily.  It wasn’t complex, but a complex beer can often be harder to drink.

All in all, a great beer, and I’m happy at how it came out.

Now let’s see if Mikey leaves a comment telling me I’m wrong…

-Chas

Tagged , , , , , ,

First adventures – keeping things warm

Howdy!

So it’s been about five days since we did the brew I talked about in my last post, and I’ve been relatively happy with the progress.

As I mentioned in my previous post, there was some concern about keeping everything warm enough during the fermentation process.  We were also worried about the morning sun hitting the fermenting tub: the UV can harm your yeast and make generally bad flavours.  To solve these two problems, the brew spent the week wrapped in a blanket:

Beer needs to me tucked in nice and tight when it gets sleepy.

Beer needs to be tucked in nice and tight when it gets sleepy.

This worked surprisingly well.  The yeast manages to produce some of its own heat during the fermentation process, so this blanket kept everything in.  Although my house got as low as about 13 degrees C over night, the wort consistently sat at about 22 degrees C when I checked it in the morning.  It could be a little warmer, but this is still a great temperature. And it was relatively constant, so that’s great.

Another alternative I’ve heard being used is to place your fermenter in an old bar fridge (not on). Refrigerators are extremely well insulated, so this method will keep everything warm (or cool), and more importantly constant.

In warmer months, this method can also be used to keep things cool, just don’t leave the refrigerator on constantly, otherwise things will be too cool.  If you get a fancy enough fridge (or a wine fridge), you may even be able to set it to work at a higher temperature.

Generally, the higher the temperature, the faster the fermentation process is – to a point obviously; if things get too hot, you’ll kill your yeast.  According to the packet, the yeast we used has an optimal temperature range of 21-28 degrees C.  So since the we’re running on the lower end of that scale, the fermentation process will probably take about eight or nine days.

So next step: bottling!  But that’s still a few days away…

-Chas

Tagged , , , , , , ,

Starting small, but not dumbing it down.

Choc Paradise Porter #1

Chocolate Paradise Porter #1 in the carboy with airlock

I promised Chas that I’d put something up about my first few brews. And here we are. The whole home brewing thing has been a journey that started about two years ago. Won’t go into all that today, that’s another story.

Back in October 2012 I decided that it was time to try this brewing at home thing. I requested a brew kit for my birthday from my wife. But I couldn’t really decide on what type. Presents didn’t turn up until start of January 2013 because of my inability to chose. So I got both.

I could launch into the different kits, but again, that’s for another time.

My first brew was on 5 Jan 2013. It was a ‘Chocolate Paradise Porter’ from Brew Smith. The team at BrewSmith take a lot of complexity out of making beer, and still allow you to make some good quality beer. You use a 5 liter carboy. This is like a giant glass bottle. End result is 12+ stubbies (330ml-375ml) of beer. Due to the size of the carboy and amount of beer, this is sometimes referred to as apartment brewing.

Anyway, back to the beer. This Porter is made with a partial boil so it means making wort yourself with malt, hops and grain. The whole brew process on the stove takes an hour. Prep work is about 10 mins before. Then there’s about 30-40 mins of cool down and getting it into the carboy. All up you should be done under two hours.

Bottling was on the 12th. That was probably too early. Cracked open to drink on the 26th.

How did it turn out? Pretty good. Without telling my wife the beer was ready I gave her a taste test. She didn’t even pick that it was home brew. The beer did lack body and the chocolate flavor was a bit light, but everything else was there.

Overall this was really easy. Beer was really good and happy with the outcome.

-Mikey

Tagged , , , , , , ,