Author Archives: Brew in Review

Brew day shenanigans and birthday presents

As per the Rules of Home Brew, while we were making a Double IPA today (recipe coming), we were drinking home brew while making home brew.  Also, as mentioned in our Wildly Inaccurate Facts About Beer, there can sometimes be a bit of down time during brewing, so we get a bit stupid.

20130728_133033

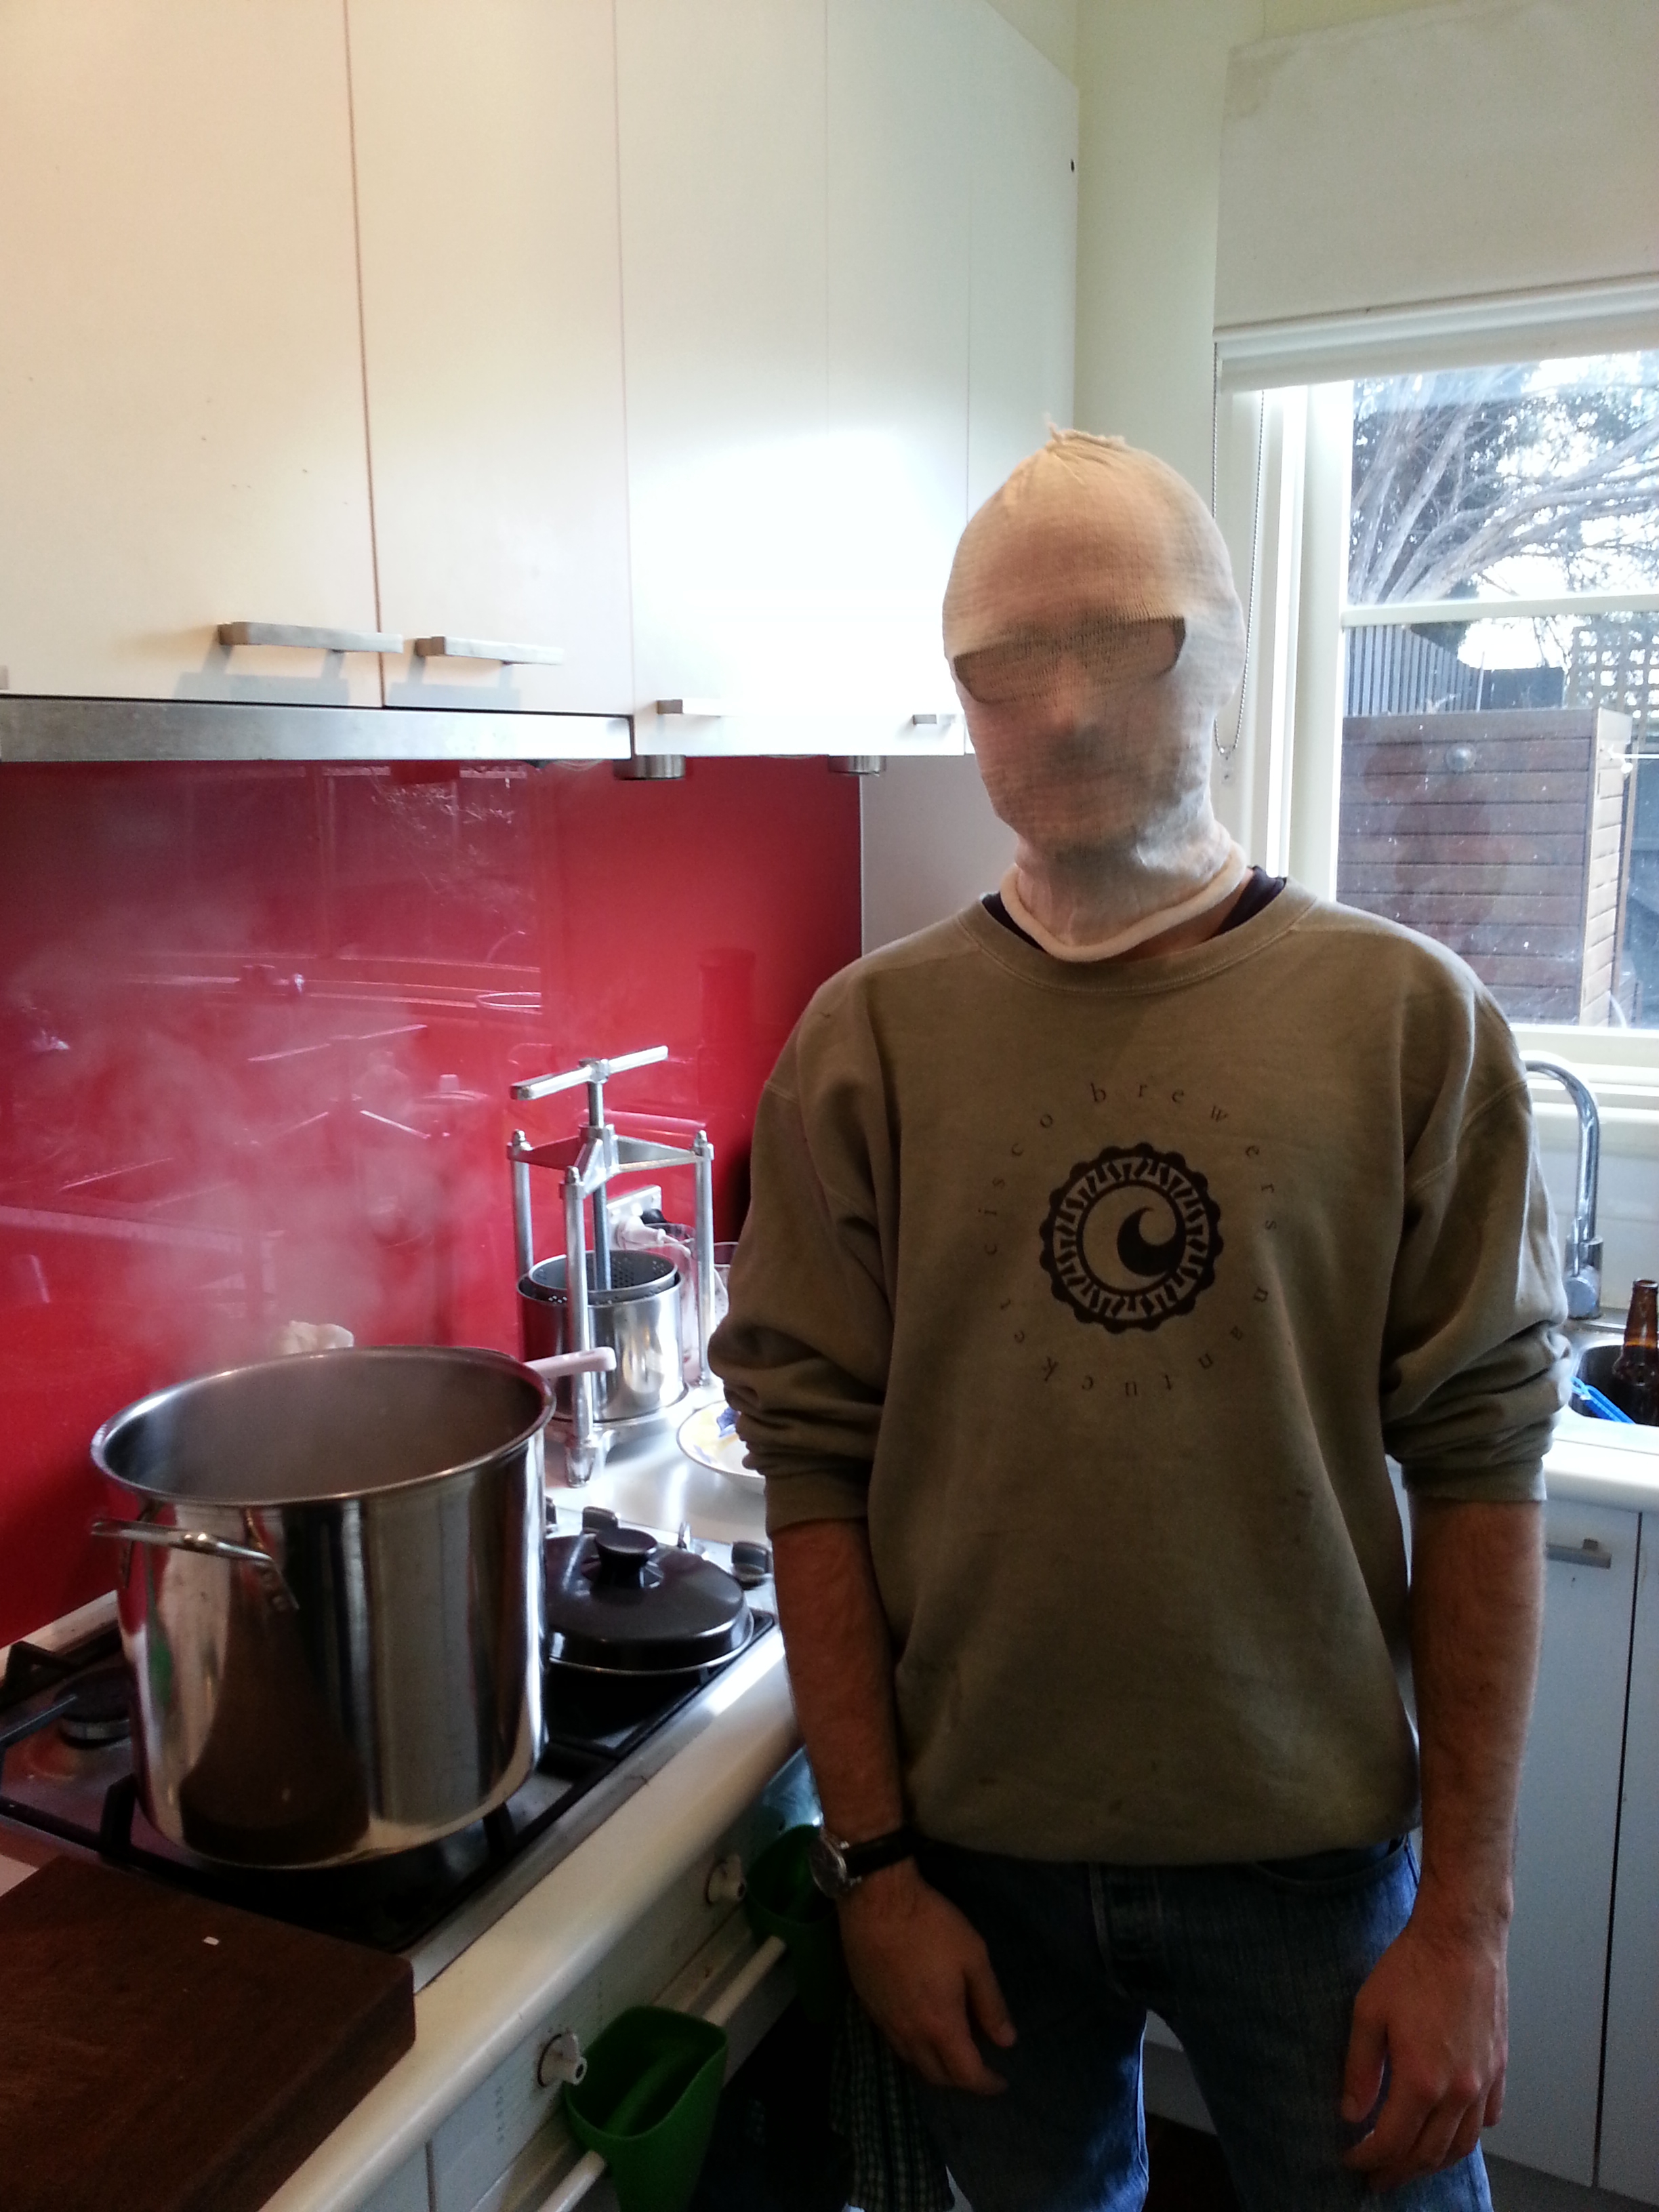
This is what happens when you have a spare grain bag and a few minutes to kill during the boil.  I was quite surprised at how hot I got in there.  I didn’t expect a grain bag to be so well insulating!

Anyway, I’m trying to start a new brewing fashion…

Oh, and for those who are a bit more observant, the metal contraption behind me is the brand new fruit press that my mom bought me for my birthday!  I haven’t been completely satisfied with how much juice I’m getting out of my juicer, as I mentioned when making some hopped cider, so hopefully this will do the job better.  It will surely get some use soon.

The press may not be robust enough to press full apples, but since the juicer ends up with so much pulp, it will come in handy for pressing any remaining juice out of the pulp.  I have found that the pulp holds a lot of juice, but it’s impossible to squeeze this out.  And obviously I can press other things as well!

That’s it from me until I finish off the new Double IPA recipe that we made today.

-Chas

PS.  Thanks again to my mother for taking me to the home brew store and basically letting me go nuts!

PPS. Sorry dad for not thanking you directly, but as awesome as the angle grinder is, this ain’t no power tool blog!

PPS.  My dad got me an angle grinder by the way… Thanks dad!

Tagged , , , , ,

Trappist Afterland Russian Imperial Stout – review

Last weekend I saw a band called Trappist Afterland. Great band, good night; I’m not going to go into the music (because this is a beer blog!), but the band have done something novel with their new EP.

Trappist Afterland’s new EP is available for digital download, so they figured at the launch event, rather than selling a piece of paper with the download code on it, they attached said code to a bottle of home made beer – so every album came with the gift of beer, the greatest gift of all (other than the lovely music).

Singer/songwriter for the band, Adam Cole, explained the idea behind releasing the album with the beer:

“Being a massive beer enthusiast I liked the idea of releasing

the album with a beer to reinforce the sip and listen idea.

Great beer and good music are the ideal partners I reckon.  

And considering our band name was inspired by Abbey Ales

it seemed to fit well.”

Adam also mentioned prior to the set that he had made so much beer, he may as well do something with it!

This particular beer was made at a brew on premises (“BOP” according to the tax man) joint called Barleycorn Brewers in Oakleigh South in Melbourne. I’ve never done brew on premises, but Mikey has. Basically, rather than making it at home, a BOP has all the equipment and recipes there for you. It can be a great way to get started or if you don’t have the room at home. They generally allow you to make a very good quality beer.

20130720_102542

Tasty beer sitting in front of some tasty cider in the carboy

This beer was no exception.

Firstly, the beer was highly excitable. It was one of those stouts that had to be poured a little, wait for the foam to die down, pour, wait some more, and so on. Once the waiting game was over, what was left was a dark, thick stout with lots of body, but not too heavy.

On the nose, there were some great malt smells. There was a nice crisp clean smell, most likely brought on by the hops, and a smell of sweeter fruits.

This slight sweetness/fruit continued on in the taste, which was fairly unexpected for a stout. It went well, although sometimes felt a little inappropriate given the style of the beer. There was also a little bit of chocolate which went well with these flavours.

Of course this was complimented by the general stout bitterness. There was also a bit of spice in the hops, which I generally like in a stout. Basically, there were a few great flavours in there all interacting.

This seemed like a well designed stout, especially for those new to stouts. It was good, but very “safe”, easy, and inoffensive. All of this enhanced drinkability and made it a surprisingly sessionable heavy beer. Although I love a good stout, I’m usually done after one or two; I could have done a few of these.

Because of all of this, this beer would make a good dessert beer. The sweeter fruit flavours would go well with a drier dessert like a cake or just generally with sweet fruits. Going with a more sour/tart fruit probably wouldn’t go as well, but it might work well with some berries.

Anyway, thanks again to Trappist Afterland for sharing their great music and great brew. I highly recommend both.

-Chas

Tagged , , , , , , , , , ,

The worst thing ever…

Quick post from the tram to Mikey’s for BREW DAY. A horror story if you will.

While juggling everything to get on the tram, I dropped a perfectly good bottle of Friedlieb Porter for today’s tasting! Luckily I had two with me, but things are not going well…

Now I’m that guy on the tram who smells like beer. All my stuff is covered in beer.  I smell the wonderful aroma that was my coffee porter, but alas, it’s not because I’m drinking it.

Worst thing ever to happen in the history of the world? I think so!

-Chas

Chocolate Paradise Porter (with coffee) – Review

A little while ago, we modified the standard BrewSmith Chocolate Paradise Porter to contain coffee.  For those interested, the original Chocoalte Paradise Porter brew is here, while the review is here.

Overall, the beer turned out great.  We only made twelve bottles, and by the time tasting day came around, there were only three bottles left because Mikey’s wife (AKA Manager for Change Management/Director of Art Direction for this blog) had made her way through the rest of it!  I think she enjoyed it…

Anyway, the original taste prior to bottling was encouraging, although there was a lot of coffee in there, and it was slightly overwhelming.  After the beer was allowed to condition for a few weeks in the bottle, the overpowering flavours calmed down quite a bit.

20130707_153019The coffee was still quite obvious at first, and it really sat in my mouth.  This died down after awhile though and I started to get used to it, which allowed the other flavours to come out.  As the coffee died down, the brown sugar (which was another addition to the recipe) began to come out, but only slightly.  The brown sugar was more of a tease than an actual taste: it never came to the front.

The smoke, which was apparent in the original recipe, added a great twist as well.  It really began to compete with the coffee and add some a great interaction of different flavours.

Unfortunately, all of this tended to mask the chocolate somewhat.  The chocolate was still, but hard to find, and didn’t come out until the beer was allowed to breath for a bit.

In regards to smell, the beer was nowhere near as fragrant as it was with the original recipe.  As I mentioned, the taste before bottling had quite a bit of coffee to it, but the strong coffee smell went away with conditioning; I was really hoping for lots of coffee and peat to it, but it wasn’t there unless you really went looking for it.  There was also a little bit of spice and brown sugar in there to.  Although very subdued, the beer smelled fantastic.  I would have liked the nose to be bigger though.

All in all, this beer was full of great things, and they all complimented each other well.  It was great that there were different layers of flavour, some very obvious, some very subtle.  Sometimes the taste of something would come out of nowhere, and then wouldn’t return on the next sip.  It was a great and surprising beer.

Finally, it was great to see how a few very simple modifications could dramatically change a beer.  The original was good, the modification was better.


-Chas

Tagged , , , , , , , ,

Gauss’ Law – Hopped Cider

As mentioned, I made some cider this weekend!  Mikey doesn’t believe in cider so I had the aid of my friend who shall be referred to as the Cider Minion.  Although I’ve done brews on my own before, having a second pair of hands is always helpful, and Cider Minion was no exception.

I had originally wanted to do a proper batch of the Apple and Rhubarb Cider I made awhile ago.  The original brew was a bit haphazard so I didn’t do a recipe write up of it.  Unfortunately I couldn’t find any rhubarb, but I did have some left over hops from a porter we made, so I decided to make a hopped cider.

Judging from the Apple and Rhubarb Cider, this stuff was going to be strong; I was aiming for at least 10% alcohol.  I wanted to make this cider stronger than the previous version because I thought a little alcohol burn would add to the taste and feel of the beverage.  So I’ve decided to call this cider Gauss’ Law based on a really bad pun that I’m not going to go into.  Puns are awesome by the way.

Ingredients

  • 7 kg of Golden Delicious Apples
  • 1 cup dextrose
  • 4 grams Fuggles hops (bittering)
  • 2 grams Fuggles hops (aroma)
  • SN9 wine yeast

This was for a (what was supposed to be) a four litre batch.

Bring half a litre of water up to a boil and start steeping the bittering hops for 30 minutes.  At the 25 minute mark, add the aroma hops.

My juicer isn’t the most efficient machine in the world, so a better juicer or an apple press would probably require fewer apples, but I managed to get 3.5 litres of apple juice out of the apples, which is what I was after.  This 3.5 litres needs to be added to a separate pot from the hops and brought to a boil for about 15 minutes.  This will kill any bugs in the juice.

Once the hops are done, strain them into the juice.  Also add the dextrose (this can really be done at any time).

I was surprised this time around.  Previously I’ve gotten a pretty decent hot break out of boiling apple juice.  This wasn’t the case, even though I’ve used Golden Delicious apples before.  Oh well…

Once your juice has boiled for at least 15 minutes, put a lid on the pot and let it sit in a sink full of cold water for at least 20 minutes, changing the water regularly.

Throw all of this into a 5 litre fermenter and pitch the yeast and it’s done!

Unfortunately this process only left me with about 3.5 litres all up, even though I started with half a litre of water for steeping the hops and 3.5 litres of apple juice.  I guess I underestimated how much I would lose to evaporation in the boil, or I under measured things.

The OSG I got was right on 1.070, which wasn’t quite as high as I was hoping for.  The OSG on the Apple and Rhubard Cider (which didn’t have added dextrose) was 1.064, I was probably a little conservative with the dextrose.  The previous cider managed to get a FSG below 1, but I don’t quite expect that with this one because the hops are adding to the specific gravity (although only slightly).  My prediction is an alcohol content of about 9.5% after bottling.  It’s not quite what I wanted.

Anyway, that’s going to take at least two weeks in the carboy, then bottling, then tasting.  We’ll see how it turns out!

-Chas

Tagged , , , , , , , , ,

Handy Sections Added!

Have you ever come to this website and thought “I love We Make Home Brew!  Getting regular updates on different home brews is great, but if I want to find an older recipe, kit, or review, I have to scroll back through every thing, it’s just a whole lot of no fun that takes away from the otherwise enjoyable experience of reading about home brew.  I mean, hey, I like reading about home brew as much as the next guy, but who has the time?!”

Well, firstly, thank you for taking so much time to think about this humble site, and wanting to read older stories.  Secondly, we’ve got it sorted for you!

There is now a recipes section, a kits section, and a reviews section with listings by style to relevant articles.  Links to these sections are above with all the other sections.

So have a browse and check back regularly.  It will be fun to see the list grow!

– Chas

Tagged , ,

Thomas Coopers Heritage Lager #2 – Review

While Mikey has been quite good with his updates lately, especially with his ongoing Journey to Home Brew story, I have been quite slack.  We hadn’t done a proper brew in a couple weeks (I did bottle the Friedlieb Porter last weekend though), and I’ve just been generally busy/worn out.

Anyway, I got through all of that and had a weekend of home brew!  Not only was a hopped cider AND a stout made, but we also managed to bottle some brown ale, and the remainder of the lager, plus we tried four brews that are finally ready for drinking.  Mikey will be writing up the stout brew and reviewing two of the beers, I’ll write up the cider and reviewing the other two.

So, rather than one huge update with all of this, I’ll be trickling the updates out, starting with the review of the Thomas Coopers Heritage Lager here.

Mikey and I both got the same starter kit that came with the same can of Thomas Coopers Heritage Lager.  We made my can first and followed the directions to simply add a kilogram of dextrose to the wort.  While the beer turned out fairly OK, it wasn’t the most amazing thing either of us ever had.  So since Mikey had the same kit, we decided to try it with some malt rather than dextrose.

All in all, the addition of the malt made for a much better, more well rounded beer.20130707_151143

The beer was a fairly standard lager: there was nothing that stood out or was of any amazing interest.  The body was quite good though, there was a nice finish, and quite a lot of fragrance.

On the nose, there was a ton of fruit and a bit of sweetness.  This fruit continued on the first impression of the taste.  It was almost a passion fruit taste, but without the typical sourness associated with passion fruit.  With this was also the distinct taste of melon.

The beer had very little bitterness to it.  In my opinion, the addition of some bitterness would have been beneficial.  While the fruit was a lot of fun and made the beer light and easy to drink, that’s all there was to it.  With the addition of some bitterness, the dominant fruit flavours would hopefully have been countered, adding a little complexity to the beer.

On that note, the beer tapered off quite quickly after that.

Overall, the beer was simple, but very easily drinkable.  A lager can be difficult to rave about or go to deeply into.  They generally lack complexity and this beer was no exception.  I’ll happily continue to drink it though!

-Chas

Tagged , , , , , , ,

Summer Citrus Blonde Ale – Review

So the Summer Citrus Blonde Ale that we made a few weeks ago is done!  Once again, this one was from the guys at BrewSmith.

This beer was ready to drink pretty quickly.  Being a blonde, it was OK to drink without letting it condition for too long, although leaving it the bottle for awhile probably wouldn’t hurt it either.  It was a lovely light beer, so conditioning it longer wouldn’t have been of much benefit anyway.

First impressions on the aroma were great, albeit subdued.  The main thing that came out in the smell was citrus with a little bit of alcohol; although it’s possible my nose got a little confused and it was just the citrus.  Hunting for it, there was a bit of a smell of malt, but more of a lager smell than anything (although this beer was an ale).  Going further, there was the slightest hint of caramel, probably still from the malt.20130616_154041

As I mentioned, it was very light in feel, although not thin at all.  There was a good amount of body to it.  The citrus, which was dominant but not overpowering, gave everything a crispness that made the beer refreshing and not heavy at all.  Although lemon zest was used to give these flavours, it was definitively a general citrus feel rather than just lemon.

The citrus really cleared my head with every sip, making it extremely refreshing.  I was surprised at how much the coriander came through as well.  I was also surprised that I enjoyed the coriander!

Although the beer was not overly hopped, there was a slight amount of bitterness that interacted well with the citrus.  The hops gave no fruit or spice.  Some fruit would have been welcome (although not needed), although spice would have been inappropriate.

Being such a light beer, I’m sure this would be highly sessionable.  I didn’t get the alcohol content from Mikey, but maybe he’ll enlighten us in the comments.  I suppose the only problem I had with my tasting was that it was done during one of the coldest weeks we’ve had in Melbourne so far this year!  Having one (or five!) of these on a hot summer’s day would be no problem at all.

If I would change anything at all, I would probably add a little more bitterness to further compliment the citrus.  That, or a little more fruit in the aroma would serve the beer well.

As for food, a light BBQ (chicken perhaps) would be great, or something with a bit of spice.  The main thing I’d recommend though is steamed crab, especially with ample amounts of Old Bay seasoning.  That would be the way!

-Chas

P.S. I also had one of the malted ciders I made awhile ago.  It turned out great!  My house mate went crazy for it and stole the whole glass when I offered her a taste of what would have been my second bottle…  I’ll give one to Mikey to do a proper review of later.

Tagged , , , , , , , ,

Yeast!

Howdy!

I thought it would be good to talk about yeast: the magic little organism that turns sugars into alcohol through the process of fermentation.

I won’t go into the fermentation process, but if you’re curious, the Wikipedia articles are quite easy to follow.  Fermentation in general can be found here – this article is not specifically about alcohol fermentation, but explains the process in general.  Alcoholic fermentation information can be found here for further reading.

Yeast in general:

Really, you can use any kind of yeast for fermentation, even regular baker’s yeast bought at the super market, but the various brewing yeasts are specifically designed for taste and alcohol tolerance.

On that note, it is possible to kill your yeast if the alcohol content of your brew gets to high.  At this point, you can’t really get anymore fermentation going because even if you add more yeast, that will probably die too!  Then you’re left with a half fermented beer that still has lots of sugars in it, which would probably taste quite interesting, but not in a good way.  Don’t worry too much though, it’s easy to track down yeasts that will be good well into the high teens/twenties on alcohol percentages; these are generally wine making yeasts.

If you’re making a cider or anything with fruit, it’s also possible to use the wild yeast that naturally grows on fruit peels.  In fact, my mother uses this to make home made vinegar: her most interesting concoction was a banana vinegar!  The problem with using wild yeast is ensuring that it’s only the wild yeast that goes into your wort (or juice if doing cider) and not other bugs that will mess up your brew.  I have yet to attempt this, but it may be fun!

Yeast and temperature:

Yeast is pretty resilient, so if it gets too cold, you won’t kill it.  It just gets a bit sleepy and slows down a bit.  You can even freeze yeast if you want to preserve it.  This means that even if your wort gets a bit cold, things will keep working, just more slowly.  Although this isn’t too bad, be aware that if your wort is in the fermenting tub for too long, sediments may begin to taint the taste of your beer.

On the other side though, if your yeast gets too hot, it will probably die, just like anything else.  So although heat will help speed up the fermentation process, there is a point where you won’t get anymore benefit and the heat will actually be detrimental.  Make sure your wort is at specified temperatures before pitching your yeast.

Experimenting with yeast:

Of course it’s easiest to simply buy yeast from your local home brew supply store, but experimenting with different kinds of yeast can be a bit of fun.  The different strains that you can buy at a good home brew supply store have different characteristics for taste, optimal temperature, and alcohol tolerance.  This means that you’ll use a different yeast for different kinds of beers.

For example, there are specific kinds of yeast for ales, lagers, and wines.  With the few cider experiments I’ve done, I’ve always used an SN9 wine yeast and been happy with the results.  As it’s not desirable in a cider/wine, this type of yeast doesn’t leave any taste behind.  Sometimes you want some of that taste in your brew, and you can generally find a yeast that will do that for you.

That’s it on yeast for now!


-Chas

Tagged , , , ,

“The Friedlieb” Coffee Porter – first trial

Friedlieb Runge was a German chemist and the first person to isolate caffeine. Because of this, it’s only appropriate to name our ongoing coffee porter experiment after him!

As much as we liked the Brewsmith porter kits we did (we’re still waiting to see how the coffee version turned out), they’re only sold with enough ingredients to make about four litres – so what do we do when we want to make a big batch? Adding to that, they are a bit expensive when compared to sourcing the ingredients directly. Don’t get me wrong on this. The price of the Brewsmith kits is quite fair, but if you’re willing to take the time to try and recreate their recipes, you can save a bit of money. If you’re not willing to take the time to recreate the recipe, then hey, keep buying the kits because they do a great job.

Anyway, as a base, we used a recipe presented by the great Craig of Craigtube. If you haven’t checked this guy out yet, do it! We weren’t able to get all the ingredients here in Australia, plus we didn’t want to use a canned wort with bittering hops in it, so there was some improvising.

20130609_182318

Since this was the first attempt, it was only a 4 litre batch.

The recipe and ingredients we went with was as follows:

  • 580 grams light liquid malt extract
  • 90 grams dark dry malt extract
  • 90 grams dark crystal
  • 50 grams chocolate malt
  • 40 grams peated malt
  • 50 grams melanoidin malt
  • 60 grams rye malt
  • 3 grams Willamette hops (bittering)
  • 3 grams Fuggles hops (taste)
  • 3 grams Fuggles hops (aroma)
  • 8 shots expresso
  • 1 cup brown sugar
  • Windsor style ale yeast

Steep the grains (using a grain bag) in about two litres of water for 20 minutes (on reflection we probably should have done 40…). When this is done, remove the grains and sparge them with a litre of boiling water.

Bring this three litres up to a boil and throw in three grams of Willamette hops for the start of your thirty minute total boiling period. At the 15 minute mark, put in three grams of Fuggles hops. Finally, with five minutes remaining, put in another three grams of Fuggles.

At the end of the thirty minute boil, turn off the heat and put in the eight shots of espresso as well as the brown sugar and give it a good stir. Put a lid on the pot and immerse it in a sink of cold water for twenty minutes, changing the water halfway through.

Throw this all into a five litre carboy, and top up with one litre of water. Try to get the temperature to between about 18 and 26 degrees with this top up.

Pitch the yeast and you’re done!

Other Notes

We got a gravity reading of 1.054, so we’re expecting an alcohol content of somewhere in the mid 4% range after bottle conditioning; I imagine the final gravity will be a little high due to the yeast type as well as the coffee, which isn’t fermentable but adding to the specific gravity.

In relation to hops, I found that the Willamette had bitter and dry smell with a hint of spice. The Fuggles were less bitter, with a more fragrant fruity/floral smell.

While the wort was boiling, the chocolate was quite overpowering when right over the stove, the smokiness came out quite a bit when I stood back. There weren’t any big hops smells, but when tasting the wort, they were definitely there and quite nice.

Overall, this should be a pretty good brew. We’ll see if it’s anything at all like the Brewsmith kit, but it should taste good any how.

-Chas

Tagged , , , , , , , , , ,